
“`html
If you have a soft spot for indulgent desserts but prefer to keep things plant-based, the Vegan Creme Brulee Ice Cream (No Churn) Recipe is an absolute dream come true. This luscious frozen treat combines the silky richness of classic creme brulee with the creamy delight of ice cream, all without any complicated equipment or dairy ingredients. It’s smooth, sweet, and topped with that signature caramelized sugar crunch that makes every bite feel like a special celebration. Trust me, once you try this no-churn gem, it will become your go-to dessert for impressing guests or simply treating yourself on a cozy night in.
Ingredients You’ll Need
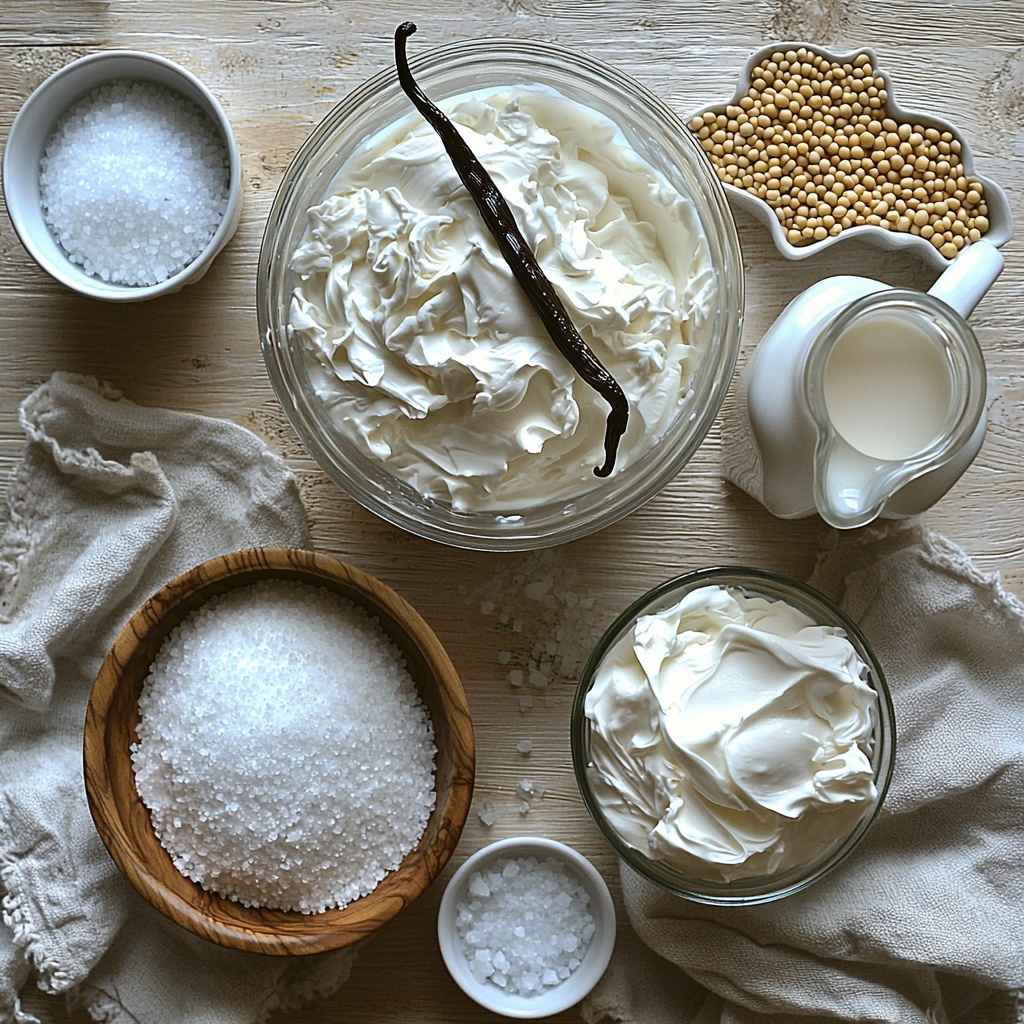
This Vegan Creme Brulee Ice Cream (No Churn) Recipe requires just a handful of straightforward ingredients, each playing a vital role in creating that perfect balance of creamy texture, vanilla warmth, and caramelized sweetness. Every component is chosen to build layers of flavor and achieve that luxurious mouthfeel we all crave in a great ice cream.
- 420 ml soy milk: Provides a smooth, creamy base that’s light but rich enough to hold the flavors.
- 30 g cornstarch: Acts as a natural thickener, giving the custard a velvety consistency without eggs.
- 240 g vegan condensed milk: Adds essential sweetness and body, mimicking the traditional condensed milk’s richness.
- 1 vanilla pod: The star ingredient for that pure, aromatic vanilla flavor; scraping the seeds ensures maximum infusion.
- ¼ teaspoon sea salt: Balances the sweetness and enhances all the other flavors beautifully.
- 400 ml vegan whipping cream (chilled overnight): Whipped to fluffy perfection, it’s what makes this ice cream ultra creamy and luscious.
- 60 g granulated sugar: Used to create the iconic caramelized crispy topping that sets creme brulee apart.
How to Make Vegan Creme Brulee Ice Cream (No Churn) Recipe
Step 1: Prepare the Vanilla Custard Base
Begin by combining the soy milk, cornstarch, and vegan condensed milk in a saucepan, whisking thoroughly so there are no lumps. Next, cut your vanilla pod lengthwise and scrape out the fragrant seeds; add both the seeds and the pod to the saucepan. Place this mix over medium heat and prepare for the magic!
Step 2: Thicken the Custard
Gently simmer the mixture on low-medium heat for about 5 minutes, whisking constantly to prevent anything from sticking or scorching. You’re aiming until the custard thickens just enough to coat the back of a spoon, giving it that classic creamy texture.
Step 3: Strain and Chill
Once thickened, pour the custard through a fine-mesh sieve into a bowl to remove the vanilla pod and any residual bits, ensuring silky smoothness. Cover the surface directly with plastic wrap to prevent a skin from forming, then chill in the fridge for one hour to cool it down completely.
Step 4: Whip the Vegan Cream
In a large bowl, take your cold vegan whipping cream and whip it with an electric mixer until it transforms into soft, fluffy peaks. This delicate step is what makes the ice cream delightfully light while maintaining that dreamy creaminess.
Step 5: Fold Custard into Cream
Whisk the chilled custard once more, then carefully fold it into the whipped cream with a rubber spatula. This gentle folding ensures the custard and cream combine evenly without deflating the airy texture you just created.
Step 6: Portion and Freeze
Divide the mixture into 4 to 8 ramekins, depending on the size you like. Cover them tightly and place them in the freezer for at least 4 hours so the ice cream can set to perfection — patience here definitely pays off!
Step 7: Caramelize the Sugar Topping
Before serving, let the ice cream sit at room temperature for 10 to 15 minutes to soften just a little. Then sprinkle an even layer of granulated sugar over each ramekin. Using a culinary blowtorch, carefully caramelize the sugar until it beautifully browns and forms that signature crackly topping.
How to Serve Vegan Creme Brulee Ice Cream (No Churn) Recipe
Garnishes
Adding a simple garnish can elevate this already stunning dessert. Consider scattering fresh berries like raspberries or blackberries on top for a pop of color and tartness, or sprinkle some toasted coconut flakes to introduce subtle texture and tropical warmth. A small sprig of mint can also bring a fresh contrast that complements the caramelized sugar flawlessly.
Side Dishes
This ice cream shines on its own but pairs wonderfully with light accompaniments. Serve alongside a crisp almond biscotti or spiced vegan shortbread cookies for dipping. If you prefer fruit, baked apples or poached pears seasoned with warming spices create an inviting combo that feels cozy and sophisticated.
Creative Ways to Present
For a captivating presentation, try serving the ice cream in clear glass cups to showcase its creamy texture and golden sugar top. Alternatively, serve it alongside a drizzle of vegan caramel sauce or vegan chocolate ganache for extra decadence. For a festive touch, place the ramekins on a small wooden board with edible flowers and powdered sugar dusting.
Make Ahead and Storage
Storing Leftovers
Any leftover Vegan Creme Brulee Ice Cream (No Churn) Recipe can be stored in airtight containers and kept in the freezer for up to 3 to 4 days without losing its fabulous texture or flavor. Be sure to cover tightly to protect it from freezer burn and flavor absorption.
Freezing
This no-churn ice cream freezes beautifully, so prepping it ahead of time is ideal for busy days or entertaining. Just keep the ramekins covered or transfer the mixture to a suitable freezer-safe container. When you’re ready to serve, allow it to sit out 10-15 minutes at room temperature before torching the sugar for that perfect crunch.
Reheating
If your sugar topping loses its crunch, simply re-sprinkle a thin layer of sugar and re-caramelize it quickly with the blowtorch. Avoid warming the ice cream itself as it’s best enjoyed cold; the brief room temperature rest before serving is just to soften it slightly for spooning.
FAQs
Can I use a different plant milk?
Absolutely! While soy milk works excellently for creaminess, you can experiment with oat or almond milk. Just keep in mind that texture and flavor could vary slightly, so using a rich, unsweetened version is best for maintaining that custard feel.
What if I don’t have a culinary blowtorch?
You can caramelize the sugar under a hot broiler for a minute or two, watching closely to avoid burning. Another option is briefly using a small kitchen torch or even a lighter carefully, but a culinary blowtorch is safest and most effective.
Is this recipe suitable for nut allergies?
Yes, this version uses soy milk and vegan whipped cream without nuts, making it suitable for many with nut sensitivities. Just ensure your vegan condensed milk and whipping cream options do not contain nut derivatives.
Can I double the recipe?
Definitely! The ingredients scale up easily, so feel free to double or even triple the batch—just make sure you have enough freezer space and appropriately sized containers for freezing and caramelizing.
How can I make the ice cream firmer?
For a firmer texture, extend the freezing time to 6 hours or overnight. Also, chilling your mixing bowl and utensils beforehand helps the whipped cream maintain stiffness, resulting in a sturdier final product.
Final Thoughts
Making this Vegan Creme Brulee Ice Cream (No Churn) Recipe at home is one of those joyful culinary experiences where simplicity meets elegance. It’s such a rewarding dessert to share with friends and family, perfectly blending creamy vanilla custard and that magical burnt sugar topping in a dairy-free format. I can’t wait for you to taste this luscious treat—once you do, it’s guaranteed to become a permanent favorite in your recipe collection!
“`
Print
Vegan Creme Brulee Ice Cream (No Churn) Recipe
- Prep Time: 40 minutes
- Cook Time: 10 minutes
- Total Time: 4 hours 50 minutes
- Yield: 4 servings
- Category: Dessert
- Method: No-Cook
- Cuisine: Vegan
- Diet: Vegan
Description
This Vegan Crème Brûlée Ice Cream is a rich and creamy dairy-free dessert that combines the classic flavors of crème brûlée with the indulgent texture of ice cream, all without the need for an ice cream maker. Made with soy milk, vegan condensed milk, and vegan whipping cream, it delivers a luxurious treat topped with caramelized sugar for that signature brûlée crunch.
Ingredients
Custard Base
- 420 ml soy milk
- 30 g cornstarch
- 240 g vegan condensed milk
- 1 vanilla pod
- ¼ teaspoon sea salt
Whipped Cream
- 400 ml vegan whipping cream (chilled overnight)
- 60 g granulated sugar
Topping
- Additional granulated sugar for caramelizing
Instructions
- Prepare Custard Mixture: In a saucepan, combine the soy milk, cornstarch, and vegan condensed milk. Whisk thoroughly to eliminate any lumps. Split the vanilla pod lengthwise and scrape out the seeds, then add both seeds and pod to the saucepan.
- Simmer and Thicken: Place the saucepan over medium heat and gently simmer on low-medium, whisking continuously for about 5 minutes until the mixture thickens enough to coat the back of a spoon.
- Strain Custard: Pass the thickened custard through a fine-mesh sieve into a bowl to remove the vanilla pod and any residue, ensuring a smooth texture.
- Chill Custard: Cover the custard surface directly with plastic wrap to prevent a skin from forming and chill it in the refrigerator for one hour.
- Whip Cream: Using an electric mixer or stand mixer, whip the chilled vegan whipping cream until it becomes light and fluffy.
- Combine Custard and Cream: Whisk the chilled custard briefly, then fold it carefully into the whipped cream using a rubber spatula until evenly mixed without deflating the cream.
- Freeze Ice Cream: Transfer the mixture evenly into 4 to 8 ramekins as desired, cover them, and freeze for at least 4 hours until set.
- Caramelize Sugar Topping: Before serving, allow the ice cream to soften at room temperature for 10-15 minutes, then sprinkle an even layer of granulated sugar on top of each serving. Use a kitchen blowtorch to caramelize the sugar until it forms a golden, crispy crust similar to traditional crème brûlée.
Notes
- Use full-fat vegan whipping cream chilled overnight for better whipping results.
- If vegan condensed milk is unavailable, it can be substituted with a homemade blend of plant-based milk and sugar reduced over heat.
- Vanilla pods can be substituted with high-quality vanilla extract or paste if preferred.
- The blowtorch step is essential to achieve the characteristic brûlée caramelized sugar topping.
- Ensure the custard is fully chilled before folding into the whipped cream to maintain the ice cream’s texture.
- This recipe does not require an ice cream maker, making it simple for home cooks.


