“`html
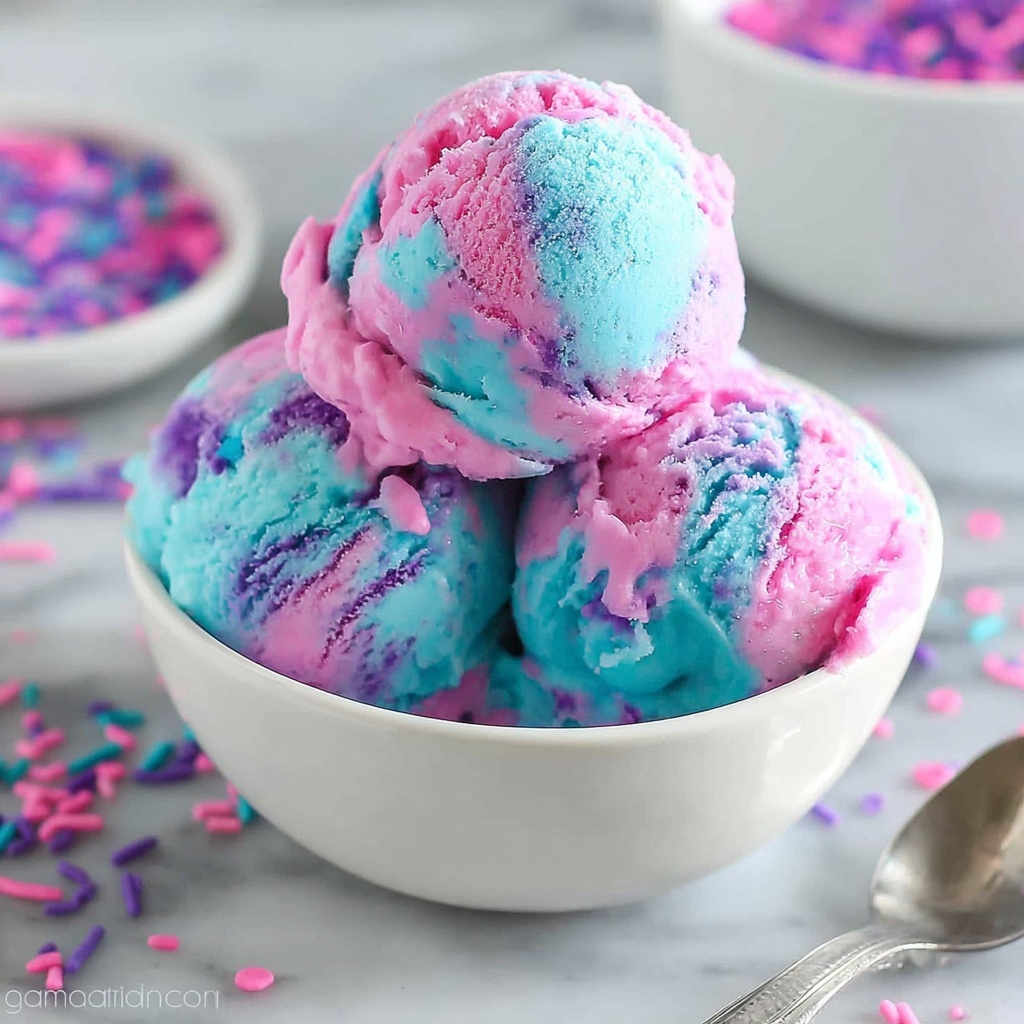
If you’ve ever dreamed of capturing the whimsical, sweet magic of cotton candy in a creamy frozen treat, this No-Churn Cotton Candy Ice Cream Recipe is exactly what your dessert dreams are made of. It’s a delightfully simple and fun recipe that combines luscious whipped cream, sweetened condensed milk, and that unmistakable cotton candy flavor to create an indulgence that’s creamy, colorful, and utterly irresistible. Best of all, you don’t need an ice cream machine to pull it off—just a bit of patience and a love for nostalgic sweets!
Ingredients You’ll Need
This No-Churn Cotton Candy Ice Cream Recipe calls for just a handful of straightforward ingredients, each one playing a vital role in crafting its smooth texture and vibrant flavor. From the rich creaminess to the playful pastel hues, every component helps turn simple ingredients into a dreamy homemade ice cream.
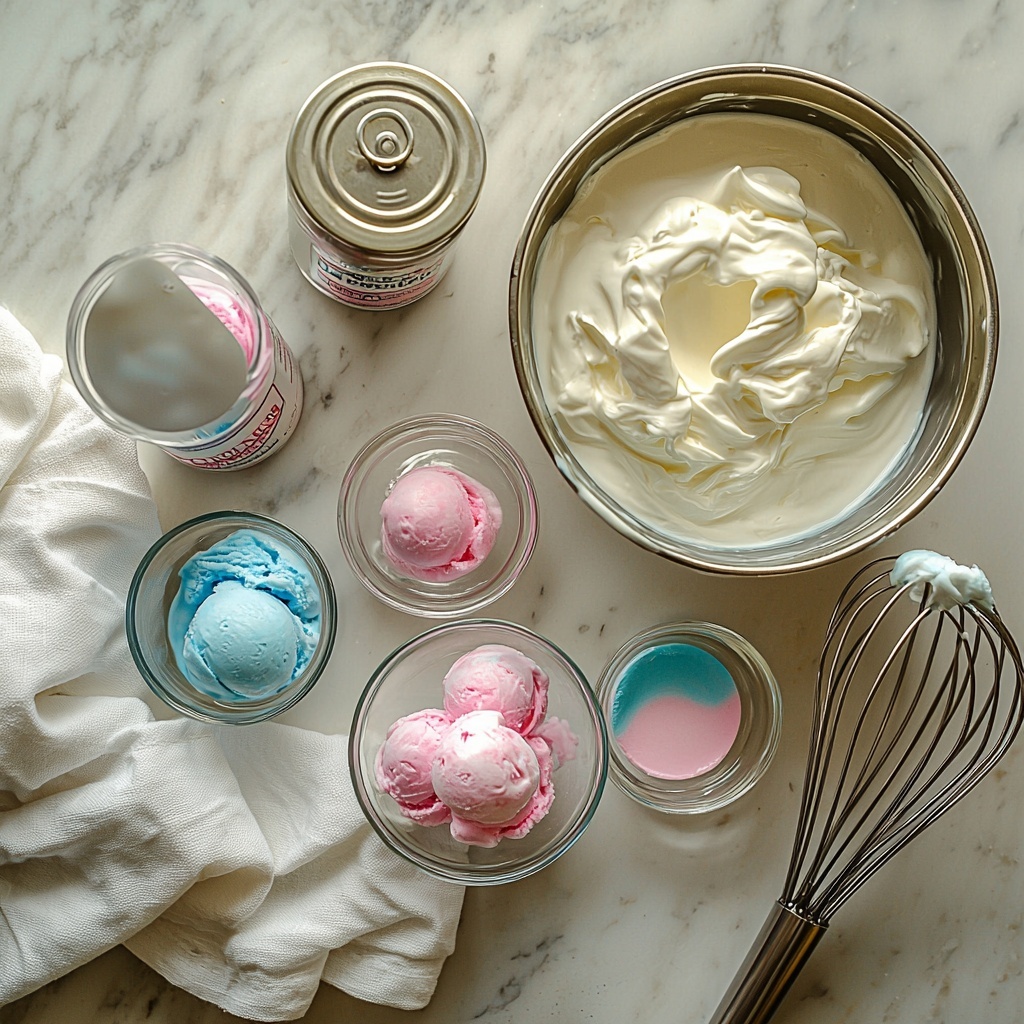
- 2 cups very cold heavy whipping cream: The foundation of the ice cream’s creamy texture, whipped to perfectly fluffy peaks.
- 1 14-ounce can sweetened condensed milk (cold): Adds decadence and sweetness that balances the airy cream without requiring additional sugar.
- 2 teaspoons cotton candy flavoring: The star ingredient that gives the ice cream its magical carnival-inspired taste.
- Food coloring in pink and blue (optional): Brings a vibrant, fun color swirl that makes the ice cream as joyful to look at as it is to eat.
How to Make No-Churn Cotton Candy Ice Cream Recipe
Step 1: Prep Your Equipment and Ingredients
Before you start, make sure your loaf pan, mixing bowl, and whisk are chilled in the freezer for about 30 minutes. This cold prep is the secret to achieving fluffy, stiffly whipped cream. Plus, ensure that your whipping cream and sweetened condensed milk are very cold—this helps the ice cream set beautifully without an ice cream maker.
Step 2: Whip the Cream
In your chilled bowl, whip the heavy cream until stiff peaks form. This usually takes about 4 minutes. You’ll want the cream light and airy—it’s what makes this ice cream feel luxuriously smooth and creamy in every bite.
Step 3: Mix Condensed Milk and Flavoring
In a separate bowl, gently stir together the sweetened condensed milk and cotton candy flavoring until completely smooth. This mixture is where the signature cotton candy flavor comes alive, blending sweetness with a nostalgic carnival vibe.
Step 4: Combine Mixtures Gently
Now the key step: gradually fold the condensed milk mixture into the whipped cream. Take your time and use a gentle folding motion to keep as much air as possible in the cream. This keeps your ice cream light instead of dense or heavy.
Step 5: Color and Layer the Ice Cream Base
Divide the mixture evenly into two bowls—about 3 cups each. Add pink food coloring to one bowl and blue to the other, stirring gently until the colors are evenly blended but still vibrant. This creates the playful cotton candy swirl effect that’s so fun and inviting.
Step 6: Layer the Ice Cream in the Pan
Remove your chilled loaf pan from the freezer, then spoon the colored mixtures by dollops into the pan alternately. Don’t worry about perfect layers—marbling the colors slightly is part of the charm!
Step 7: Add Fun Sprinkles (Optional)
If you want to take this dreamy dessert to the next level, sprinkle the top of your ice cream with colorful jimmies or sprinkles. They add a little extra crunch and whimsy that’s perfect for celebrations or just making life sweeter.
Step 8: Freeze Overnight
Pop the pan in the freezer and let the magic happen overnight (about 8 hours). This slow freeze allows the ice cream to set perfectly without the need for churning, locking in that smooth, creamy texture we all love.
How to Serve No-Churn Cotton Candy Ice Cream Recipe
Garnishes
Top scoops of this delightful ice cream with cotton candy pieces, a handful of edible glitter, or even mini marshmallows to complement the sweet, fluffy vibe. Bright-colored sprinkles or pastel edible pearls make it festive and fun, ideal for sharing with kids or anyone young at heart.
Side Dishes
Serve your No-Churn Cotton Candy Ice Cream alongside light, crisp desserts like sugar cookies or simple vanilla wafers. Fresh berries add a pop of tartness that balances the sweetness perfectly, while a drizzle of berry coulis adds an elegant touch without overwhelming the cotton candy flavor.
Creative Ways to Present
Try serving it in clear cups layered with pink and blue cotton candy for a magical effect, or create ice cream sandwiches using pastel-colored cookies. You can swirl the ice cream into a parfait glass with cotton candy fluff or even use it to top a festive cake, turning any occasion into a celebration of fun and flavor.
Make Ahead and Storage
Storing Leftovers
Store any leftover No-Churn Cotton Candy Ice Cream tightly covered in an airtight container in the freezer. This helps maintain its creamy texture and prevents ice crystals from forming. It will keep well for up to 3-4 days, making it easy to enjoy the magic over a few days.
Freezing
This recipe is made specifically for freezing, so it keeps beautifully in your freezer. Just be sure to cover it well to protect the delicate cotton candy flavor and vibrant colors. Remember, proper storage helps the ice cream stay fresh and creamy for up to 3-4 days.
Reheating
No reheating required for this ice cream! Just let it sit at room temperature for 5-10 minutes before scooping if it’s very firm for easier serving. Enjoy it chilled and creamy every time.
FAQs
Do I really need to chill the mixing bowl and whisk?
Yes! Chilling your equipment helps the cream whip faster and become fluffier, which is essential for the light texture of this no-churn ice cream.
Can I use regular vanilla extract instead of cotton candy flavoring?
You can, but the flavor will be very different. Cotton candy flavoring is what makes this recipe uniquely fun and carnival-inspired, so it’s best to use if you want the iconic taste.
Is this recipe suitable for making dairy-free ice cream?
This version relies heavily on heavy whipping cream and condensed milk, which contain dairy. For dairy-free alternatives, you would need to experiment with coconut cream and sweetened condensed coconut milk, but the texture and flavor will differ.
Why do you fold the condensed milk into whipped cream instead of mixing vigorously?
Folding gently maintains the air you’ve whipped into the cream, keeping the ice cream light and fluffy rather than dense or heavy.
Can I add mix-ins like sprinkles or candy pieces inside the ice cream?
Absolutely! Adding sprinkles, mini marshmallows, or even crushed candy can make the ice cream even more festive. Just gently fold them in after you’ve combined the flavored mixtures.
Final Thoughts
This No-Churn Cotton Candy Ice Cream Recipe is the perfect way to bring a little magic and whimsy into your kitchen with minimal effort and maximum fun. It’s creamy, colorful, and bursting with nostalgic flavor that’s bound to brighten up any day—trust me, once you try it, you’ll want to make it again and again. So grab your mixing bowl, chill your tools, and get ready to dive into a scoop (or two) of pure cotton candy joy!
“`
Print
No-Churn Cotton Candy Ice Cream Recipe
- Prep Time: 40 minutes
- Cook Time: 0 minutes
- Total Time: 8 hours 40 minutes
- Yield: 6 servings
- Category: Dessert
- Method: No-Cook
- Cuisine: American
- Diet: Vegetarian
Description
This delightful No-Churn Cotton Candy Ice Cream is a fun and easy homemade frozen treat bursting with sweet cotton candy flavor. Made without an ice cream maker, it uses whipped cream and sweetened condensed milk to achieve a creamy, smooth texture. Optional pink and blue food coloring plus sprinkles make this ice cream visually playful and perfect for parties or summer indulgence.
Ingredients
Ice Cream Base
- 2 cups very cold heavy whipping cream
- 1 (14-ounce) can sweetened condensed milk, cold
- 2 teaspoons cotton candy flavoring
Optional Additions
- Pink food coloring
- Blue food coloring
- Sprinkles or jimmies for topping
Instructions
- Chill Equipment: Place a loaf pan, a large mixing bowl, and a whisk in the freezer for about 30 minutes before starting to ensure everything is well chilled. Make sure the heavy whipping cream and sweetened condensed milk are also very cold for best results.
- Whip Cream: Using the chilled bowl (or a stand mixer), beat the heavy whipping cream on medium-high speed until stiff peaks form, about 4 minutes. This will create the light and airy base of the ice cream.
- Mix Flavoring: In a medium bowl, combine the cold sweetened condensed milk with the cotton candy flavoring. Stir until fully blended and smooth, ensuring the flavor is evenly distributed.
- Combine Mixtures: Gently fold the condensed milk mixture into the whipped cream. Fold carefully to keep as much air in the whipped cream as possible for a fluffy texture.
- Divide and Color: Separate the ice cream mixture evenly into two bowls, approximately 3 cups each. Add pink food coloring to one bowl and blue food coloring to the other. Stir gently to blend the colors without deflating the mixture.
- Layer in Pan: Remove the chilled loaf pan from the freezer. Spoon the colored ice cream mixtures alternately into the pan to create a swirled or layered effect.
- Add Toppings: Optionally, sprinkle the top with fun sprinkles or jimmies to add a whimsical touch and extra texture.
- Freeze: Freeze the assembled ice cream overnight, or for at least 8 hours, until firm and scoopable.
Notes
- Ensure all dairy ingredients and mixing tools are cold to help achieve the best texture.
- Gently folding preserves air incorporated in whipped cream, making the ice cream light and creamy.
- Use gel-based food coloring for vibrant colors without affecting the texture.
- This recipe requires no ice cream maker and is perfect for beginners looking for an easy frozen dessert.
- Store any leftovers covered in the freezer for up to one week for best flavor and texture.


