
If you’re searching for a snack that’s irresistibly crunchy, bursting with flavor, and completely guilt-free, look no further than the Keto Pepperoni Cheese Crisps: Crunchy, Guilt-Free Snack Delight Recipe. This incredible treat perfectly combines the bold, savory notes of pepperoni with a melty blend of cheeses, baked to golden, crispy perfection. It’s a low-carb snack that satisfies your cravings without any of the usual sugar or carb overload, making it a must-try for anyone embracing a keto lifestyle or just craving something delightfully crunchy.
Ingredients You’ll Need
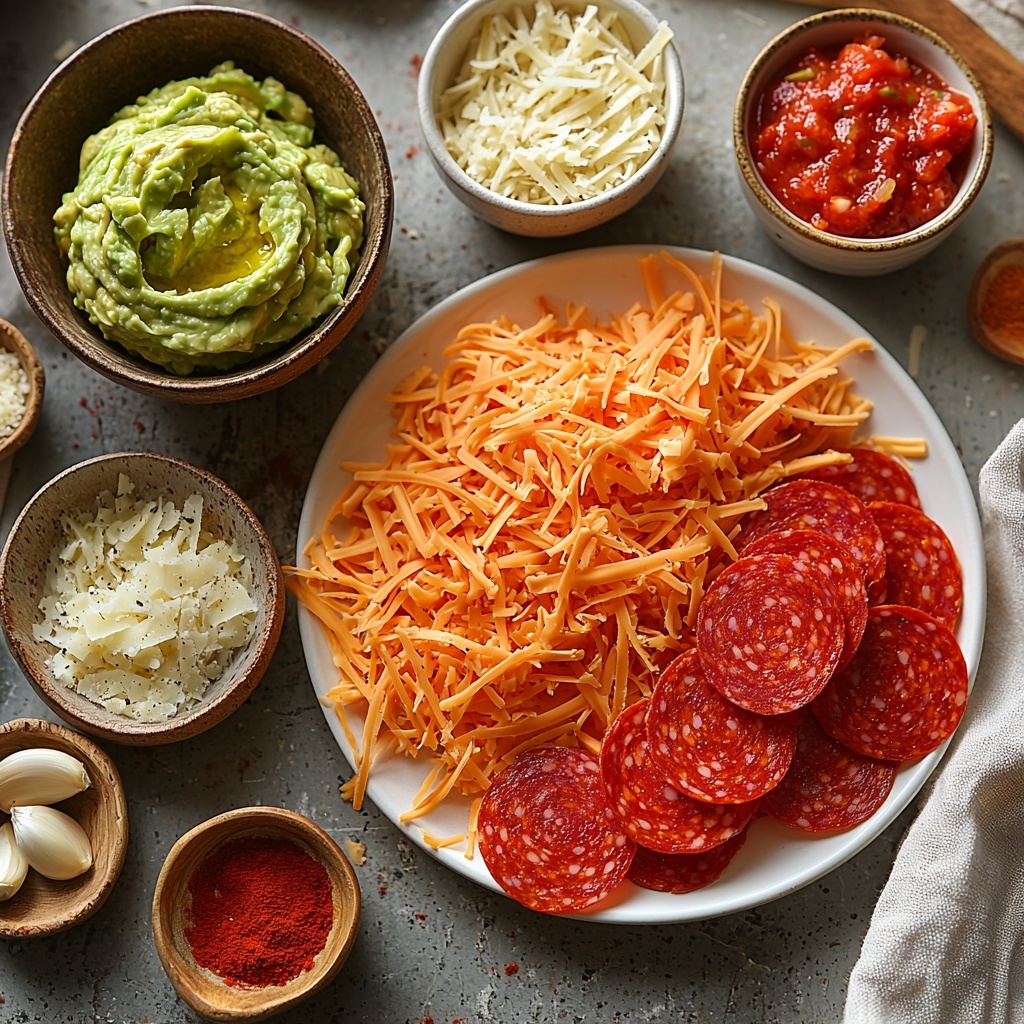
Get ready to be amazed by how a handful of simple but key ingredients can come together to create such an addictive snack. Each component has a special role, contributing to the perfect marriage of textures and flavors that bring these crisps to life.
- 1 cup Cheddar Cheese: Sharp and flavorful, it adds a fantastic punch and helps create a sturdy base for the crisps.
- 1 cup Mozzarella Cheese: Melts beautifully and offers a lovely stretchy texture that balances the sharper cheeses.
- 0.5 cup Parmesan Cheese: Packed with umami, this grated cheese brings a depth of nutty flavor and extra crispness.
- 1 cup Pepperoni Slices: The star topping that introduces a spicy, meaty kick and crispy edges.
- 1 teaspoon Garlic Powder: A subtle but essential seasoning that amplifies every bite with aromatic warmth.
- 1 teaspoon Paprika: Adds a gentle smoky undertone and a pop of color that makes these crisps irresistible.
- 1 cup Guacamole: Creamy and fresh, perfect for dipping and complementing the savory crisps.
- 1 cup Salsa: Tangy and vibrant, adds a little zest and brightness alongside the guacamole.
How to Make Keto Pepperoni Cheese Crisps: Crunchy, Guilt-Free Snack Delight Recipe
Step 1: Preheat and Prepare
Start by preheating your oven to 400°F (200°C). This high temperature is essential for melting the cheese quickly and giving the crisps a satisfyingly crunchy texture. Then, line a baking sheet with parchment paper to prevent sticking and make clean-up a breeze.
Step 2: Create Cheese Mounds
Scoop small, spaced-apart mounds of the shredded cheddar, mozzarella, and grated parmesan mixture onto your prepared baking sheet. Don’t overcrowd them; leave enough room for the cheese to spread and bubble beautifully while baking.
Step 3: Add Toppings and Seasonings
Place a pepperoni slice on top of each cheese mound. Next, sprinkle garlic powder and paprika evenly over all to build layers of flavor that will infuse into every crisp as they bake.
Step 4: Bake to Crispy Perfection
Pop the tray into the oven and bake for 5 to 7 minutes. Keep a close eye as the cheese melts and edges turn golden brown—this is the sweet spot when they’re perfectly crisp without burning.
Step 5: Cool and Serve
Once baked, let the cheese crisps cool on the baking sheet for a few minutes to firm up. This cooling step makes them easy to lift without breaking. Then transfer them gently to a serving platter or an airtight container if you’re saving some for later.
How to Serve Keto Pepperoni Cheese Crisps: Crunchy, Guilt-Free Snack Delight Recipe
Garnishes
Enhance your crisps by adding fresh garnishes like chopped chives, a sprinkle of crushed red pepper, or even a tiny dollop of sour cream. These little touches not only add color but introduce new flavor dimensions that keep every bite exciting.
Side Dishes
Pair these crisps with creamy dips like guacamole and salsa (already part of the recipe) for a perfect balance of cool and spicy. They also go great alongside a fresh salad to turn your snack into a light yet satisfying meal.
Creative Ways to Present
Serve your Keto Pepperoni Cheese Crisps on a rustic wooden board or bright ceramic plate for an inviting look. You might also stack them slightly for an eye-catching tower or arrange them around small bowls of dip to encourage sharing and mingling at any gathering.
Make Ahead and Storage
Storing Leftovers
If you have any leftovers (which might be tough), store them in an airtight container at room temperature for up to 2 days. Keeping air out helps maintain their crunch and prevents them from becoming soggy.
Freezing
These crisps freeze beautifully! Lay them flat in a single layer on a baking sheet and freeze before transferring to a zip-top bag. They will keep well for up to one month, making them wonderful to have on hand for an easy snack anytime.
Reheating
Reheat your frozen or stored crisps in a preheated oven at 350°F (175°C) for a few minutes. This method restores their crunch much better than microwaving, which can make them soft and chewy instead of delightfully crisp.
FAQs
Can I use other types of cheese?
Absolutely! While cheddar, mozzarella, and parmesan work beautifully here, feel free to experiment with gouda, pepper jack, or even a sharper blue cheese for unique flavor profiles. Just keep a mix of melty and flavorful cheeses for best results.
Is this recipe suitable for vegetarians?
Since pepperoni is a meat product, this recipe isn’t vegetarian. However, you can substitute with vegetarian pepperoni or omit it altogether and increase the cheese or add chopped olives or sun-dried tomatoes for extra flavor.
How spicy are these crisps?
The spice level is mild thanks to paprika, but if you enjoy heat, you can add a pinch of cayenne pepper or use spicy pepperoni varieties to amp up the kick.
What if I don’t have parchment paper?
You can use a silicone baking mat or lightly grease the baking sheet to prevent sticking. Parchment is preferred for easy cleanup, but alternatives work well in a pinch.
Can I make these without an oven?
These crisps rely on the oven’s dry heat for crispiness, so baking is key. If necessary, a toaster oven works great. Stovetop or microwave won’t produce the same crunchy texture.
Final Thoughts
Now that you’ve discovered how easy and delicious the Keto Pepperoni Cheese Crisps: Crunchy, Guilt-Free Snack Delight Recipe are to make, it’s time to give them a try yourself. Whether you need a satisfying snack, something to impress guests, or just a quick keto-friendly bite, these crisps hit all the right notes. Happy baking and crunching!
Print
Keto Pepperoni Cheese Crisps: Crunchy, Guilt-Free Snack Delight Recipe
- Prep Time: 5 minutes
- Cook Time: 7 minutes
- Total Time: 12 minutes
- Yield: 4 servings
- Category: Snack
- Method: Baking
- Cuisine: American
- Diet: Keto
Description
Keto Pepperoni Cheese Crisps are a crunchy, flavorful, and guilt-free snack perfect for low-carb and ketogenic diets. These cheesy crisps combine a trio of cheeses with spicy pepperoni and bold seasonings, baked to golden perfection. Served with guacamole and salsa for dipping, they make an irresistible appetizer or snack.
Ingredients
Cheese Mixture
- 1 cup Cheddar Cheese, shredded
- 1 cup Mozzarella Cheese, shredded
- 0.5 cup Parmesan Cheese, grated
Toppings & Seasonings
- 1 cup Pepperoni Slices
- 1 teaspoon Garlic Powder
- 1 teaspoon Paprika
Dips
- 1 cup Guacamole (for dipping)
- 1 cup Salsa (for dipping)
Instructions
- Preheat the Oven: Preheat your oven to 400°F (200°C) to ensure a crispy texture for the cheese crisps.
- Prepare Baking Sheet: Line a baking sheet with parchment paper to prevent sticking and make cleanup easier.
- Form Cheese Mounds: Scoop small, spaced-apart mounds of the shredded cheese mixture onto the prepared baking sheet, giving them room to spread and crisp evenly.
- Add Toppings and Seasonings: Place one pepperoni slice atop each cheese mound and sprinkle evenly with garlic powder and paprika for added flavor.
- Bake the Crisps: Bake in the preheated oven for 5 to 7 minutes until the cheese melts completely and the edges turn a golden brown.
- Cool the Crisps: Remove the baking sheet and allow the crisps to cool for a few minutes; this helps them firm up and become crisp.
- Serve or Store: Carefully lift the cooled crisps from the parchment and transfer to a serving platter or store in an airtight container if saving for later.
- Enjoy with Dips: Serve with guacamole and salsa for a delicious dipping option that complements the cheesy, savory crisps perfectly.
Notes
- Ensure the cheese mounds are small and spaced apart to prevent them from melting into one large crispy sheet.
- Use parchment paper or a silicone baking mat to prevent the crisps from sticking to the baking sheet.
- For extra crispiness, consider broiling for 1 minute at the end of baking but watch closely to prevent burning.
- Customize the seasoning according to your preference, adding chili flakes for heat or Italian herbs for additional flavor.
- Store leftovers in an airtight container at room temperature for up to 2 days to maintain crispness.


