
If you have a soft spot for cheesy, comforting bread that feels like a warm hug from the inside out, you are going to adore this Honeycomb Bread Stuffed with Cheese – A Cheesy Delight Awaits Recipe. Imagine pillowy dough pockets bursting with gooey mozzarella and savory olives, baked into a stunning honeycomb pattern that’s as beautiful as it is delicious. This recipe offers more than just amazing flavor—it’s a fun, interactive baking adventure that will impress your friends and family while filling your home with the most irresistible aroma. Get ready to enjoy a cheesy delight like no other!
Ingredients You’ll Need
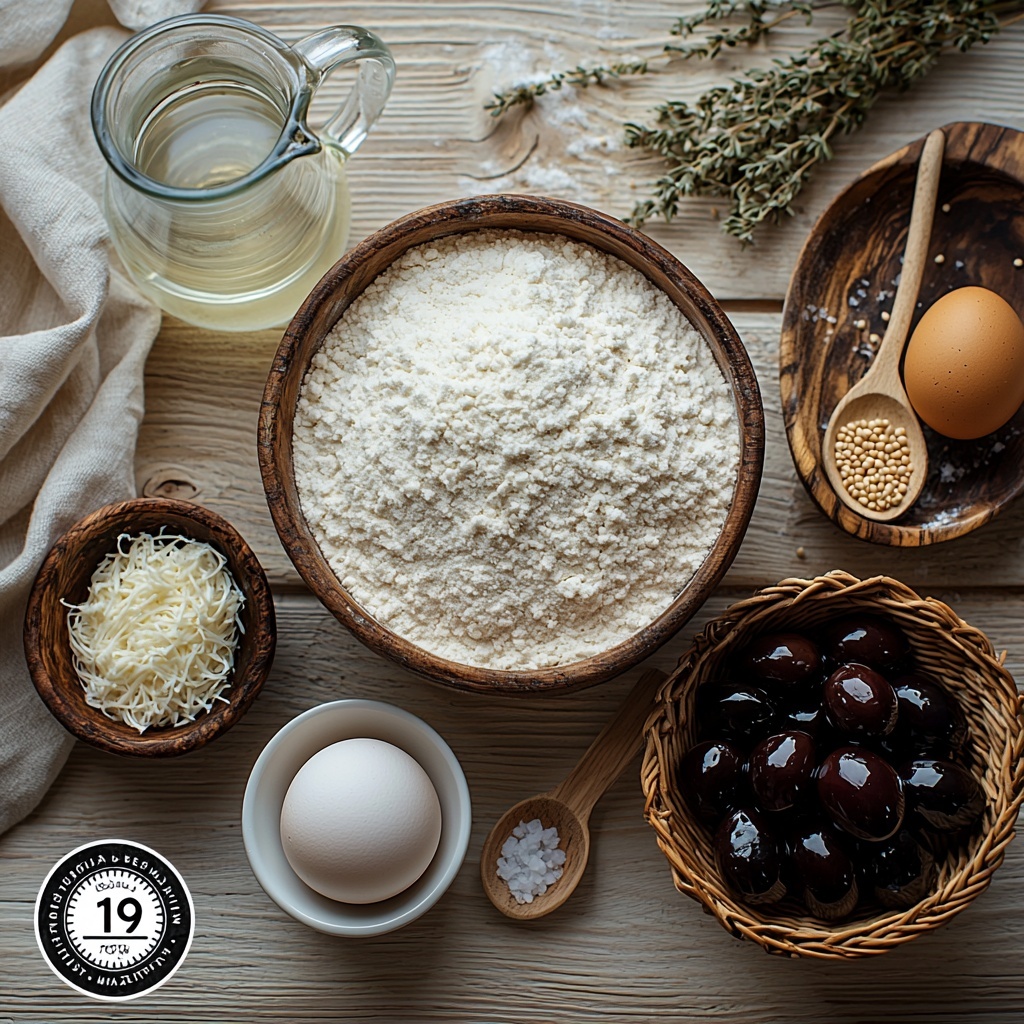
These ingredients are wonderfully simple but essential; each plays a unique role in crafting that perfect balance of flavor, texture, and visual appeal in your honeycomb bread. Using basic pantry staples ensures this recipe is approachable and achievable for any home cook, yet the results are nothing short of spectacular.
- 4 cups All-Purpose Flour: Provides the sturdy but tender base for the dough, perfect for holding all the delicious fillings.
- 1.5 cups Water (warm): Activates the yeast gently and helps develop the dough’s elasticity.
- 2 teaspoons Yeast: The magic agent that makes your bread rise to fluffy perfection.
- 1 tablespoon Sugar: Feeds the yeast and adds a touch of sweetness that balances the savory ingredients.
- 1 teaspoon Salt: Enhances overall flavor and strengthens the dough’s structure.
- 2 cups Mozzarella Cheese (shredded or sticks): The heart of the cheesy delight, melting beautifully inside each bread pocket.
- 1 cup Pitted Olives: Adds a briny, satisfying contrast that complements the creamy cheese.
- 1 large Egg White (optional): Creates a glossy, golden glaze on top for that irresistible bakery finish.
- 3 tablespoons Sesame Seeds: Sprinkle over the top for added crunch and a nutty aroma.
How to Make Honeycomb Bread Stuffed with Cheese – A Cheesy Delight Awaits Recipe
Step 1: Activate the Yeast
Start by combining your warm water, sugar, and yeast in a bowl. Let it sit happily for about 5 minutes until it becomes frothy and bubbly. This shows your yeast is alive and ready to work its magic, which is essential for that fluffy honeycomb texture.
Step 2: Prepare the Dough
To the frothy yeast mixture, add the flour and salt, mixing until a rough dough forms. Turn it out onto a clean surface and knead patiently for about 10 minutes. The goal is a smooth, elastic dough that bounces back when gently poked—this elasticity holds all that cheesy goodness inside perfectly.
Step 3: Let the Dough Rise
Grease a large bowl lightly, place your dough inside, and cover it with a clean towel or plastic wrap. Set it somewhere cozy and warm for 1 to 1.5 hours, until it doubles in size. This resting period is crucial for developing flavor and that light crumb you’ll love.
Step 4: Shape the Cheese-Stuffed Balls
After the rise, gently punch down the dough to release air, then divide it evenly into 30 small pieces. Roll each into a smooth ball, then flatten it slightly. Place about a teaspoon of shredded mozzarella and a few olives right in the center, pinching the dough carefully to seal the filling inside each ball.
Step 5: Arrange into the Honeycomb Pattern
Grease a 10-inch baking pan and nestle your cheesy dough balls close together in a circular, beehive-style pattern. This configuration encourages the beautiful honeycomb effect as the balls expand and bake, creating those signature pockets that tear apart effortlessly.
Step 6: Add the Finishing Touches
Beat the egg white lightly and brush it evenly over the dough balls for a shiny, golden crust. Sprinkle sesame seeds liberally on top for delightful flavor and crunch that elevate each bite.
Step 7: Bake to Perfection
Preheat your oven to 350°F and slide in your pan. Bake for about 25 to 30 minutes, or until the bread is irresistibly golden brown and the smell of melty cheese fills your kitchen. The result is a warm, cheesy, honeycomb masterpiece that’s begging to be enjoyed.
How to Serve Honeycomb Bread Stuffed with Cheese – A Cheesy Delight Awaits Recipe
Garnishes
This bread is a star on its own, but a sprinkle of fresh herbs like chopped parsley or basil adds a fresh pop of color and brightens the rich flavors beautifully. A drizzle of good olive oil or a little garlic butter brush post-bake can also turn it into an extra-special treat.
Side Dishes
Pairing this honeycomb bread with simple sides such as a crisp green salad or a bowl of rich tomato soup makes for a truly comforting and balanced meal. The creamy cheese and savory olives in the bread contrast perfectly with fresh, light greens or tangy, hearty soups.
Creative Ways to Present
Serve this bread on a wooden board with small bowls of dipping sauces like marinara, pesto, or even honey mustard. Rip off individual cheese-filled balls to share and watch how it becomes the centerpiece of any gathering, sparking joy and conversation around the table.
Make Ahead and Storage
Storing Leftovers
If you have any leftovers—and trust me, that’s rare—wrap them tightly in plastic wrap or place in an airtight container and refrigerate. They’ll keep delicious for up to 3-4 days, maintaining their soft texture and cheesy center.
Freezing
You can freeze this bread before baking by arranging the dough balls in the pan, covering tightly with plastic wrap, and placing them in the freezer. When you’re ready to enjoy, let it thaw and rise fully before brushing the egg white and baking. Frozen dough balls maintain their flavor beautifully for up to one month.
Reheating
To reheat and revive that fresh-baked feeling, warm leftover bread in a 350°F oven for about 10 minutes until the cheese melts again and the crust crisps slightly. Avoid microwaving if you want to preserve the texture; the oven does the trick perfectly.
FAQs
Can I use a different type of cheese?
Absolutely! While mozzarella melts wonderfully, feel free to experiment with other cheeses like cheddar, provolone, or a mix for varied flavors and textures. Just keep in mind the melting point of the cheese to maintain gooey centers.
Is it necessary to use olives?
Olives add a nice savory bite, but they’re optional. You can omit them or substitute with other fillings like sun-dried tomatoes, cooked spinach, or even pepperoni for a different twist.
Can this bread be made gluten-free?
Gluten-free baking can be tricky for bread that relies on elasticity, but you can try a gluten-free flour blend with xanthan gum. The texture might vary, but the cheesy delight will surely still shine through!
What if I don’t have sesame seeds?
No worries! You can skip the sesame seeds or replace them with poppy seeds, crushed nuts, or simply a sprinkle of coarse sea salt for extra flavor and a bit of crunch.
How do I know when the dough has risen enough?
The dough should roughly double in size and look puffed and airy. A good test is to gently press a finger into the dough—it should leave an indentation that slowly springs back. This means it’s ready for the next step.
Final Thoughts
This Honeycomb Bread Stuffed with Cheese – A Cheesy Delight Awaits Recipe is truly a gem for any cheese lover or bread enthusiast. It’s rewarding to make, impressive to serve, and absolutely irresistible to eat. I encourage you to give it a try and watch your loved ones’ faces light up with every cheesy, olive-studded bite. Happy baking!
Print
Honeycomb Bread Stuffed with Cheese – A Cheesy Delight Awaits Recipe
- Prep Time: 20 minutes
- Cook Time: 30 minutes
- Total Time: 4 hours including rising
- Yield: 30 servings
- Category: Bread
- Method: Baking
- Cuisine: Italian-inspired
Description
Honeycomb Bread Stuffed with Cheese is a delightful and visually appealing pull-apart bread featuring soft dough balls filled with gooey mozzarella cheese and flavorful olives. Baked together in a beehive pattern and topped with sesame seeds, this cheesy treat is perfect as a snack or party appetizer.
Ingredients
Dough
- 4 cups All-Purpose Flour
- 1.5 cups Warm Water
- 2 teaspoons Active Dry Yeast
- 1 tablespoon Sugar
- 1 teaspoon Salt
Filling and Topping
- 2 cups Mozzarella Cheese (shredded or sticks)
- 1 cup Pitted Olives
- 1 large Egg White (for egg wash, optional)
- 3 tablespoons Sesame Seeds
Instructions
- Activate Yeast: In a small bowl, combine warm water, yeast, and sugar. Let it rest for 5 minutes until the mixture becomes frothy, indicating the yeast is active.
- Make Dough: In a large mixing bowl, add the flour and salt. Pour in the activated yeast mixture and stir to combine. Knead the dough by hand on a floured surface or with a mixer fitted with dough hooks until it is smooth, elastic, and slightly tacky, about 10 minutes.
- First Rise: Place the kneaded dough into a lightly greased bowl, cover with a clean kitchen towel or plastic wrap, and let it rise in a warm place for 1 to 1.5 hours, or until it doubles in size.
- Prepare Dough Balls: Punch down the risen dough to release air. Divide the dough evenly into 30 pieces. Roll each piece into a smooth ball.
- Stuff Dough: Flatten each dough ball slightly. Place about 1 teaspoon of shredded mozzarella and a few olives in the center, then pinch the dough closed fully to seal the filling inside.
- Arrange in Pan: Grease a 10-inch baking pan. Place the stuffed dough balls closely together in the pan, arranging them in a beehive or honeycomb pattern so they rise and bake into one cohesive loaf.
- Apply Egg Wash and Seeds: Beat the egg white and brush it gently over the surface of the dough balls. Sprinkle sesame seeds evenly on top for a nutty crunch and visual appeal.
- Bake: Preheat your oven to 350°F (175°C). Bake the prepared bread in the center rack for 25-30 minutes, or until the bread is golden brown on top and thoroughly cooked inside.
- Cool and Serve: Remove the bread from the oven, let it cool slightly, then serve warm as a pull-apart cheesy bread.
Notes
- Ensure the water used for activating yeast is warm, around 105°F to 110°F, to avoid killing the yeast.
- For a dairy-free version, substitute mozzarella with a vegan cheese alternative.
- Olives can be swapped with other fillings such as cooked spinach, sun-dried tomatoes, or herbs depending on taste preference.
- Use egg white for brushing to get a shiny crust; omit if vegan or allergic.
- Allow bread to cool slightly before serving to prevent the cheese from being too runny and to avoid burning.
- Store leftover bread in an airtight container for up to 2 days or freeze for longer storage.


