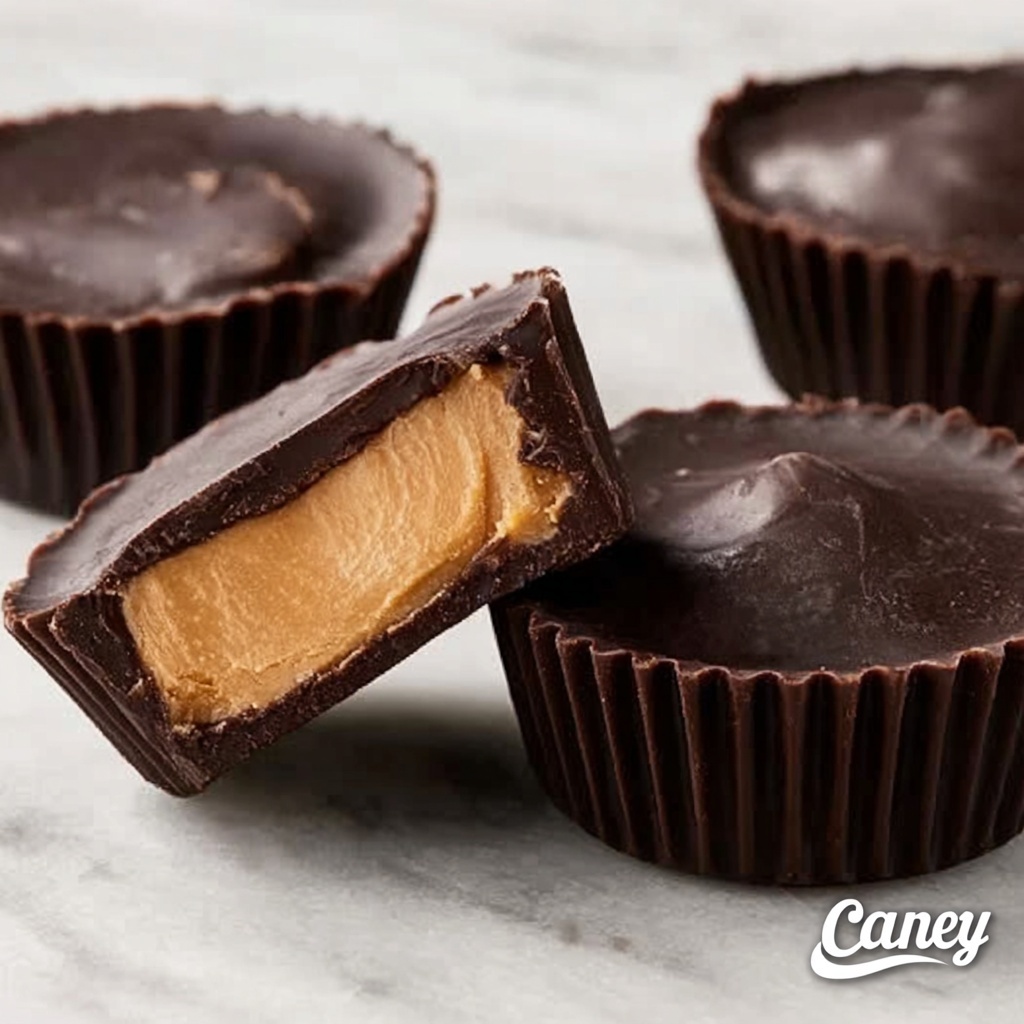
If you have a soft spot for irresistible homemade treats, then you are absolutely going to love this Chocolate Swirl Peanut Butter Cups Recipe. It’s a perfect harmony of rich, creamy peanut butter and smooth semi-sweet chocolate, swirled together in delightful bite-sized cups that melt in your mouth. Whether you’re gifting these for a special occasion or simply indulging yourself, these peanut butter cups are sure to satisfy any sweet craving with their luscious texture and balanced flavor.
Ingredients You’ll Need
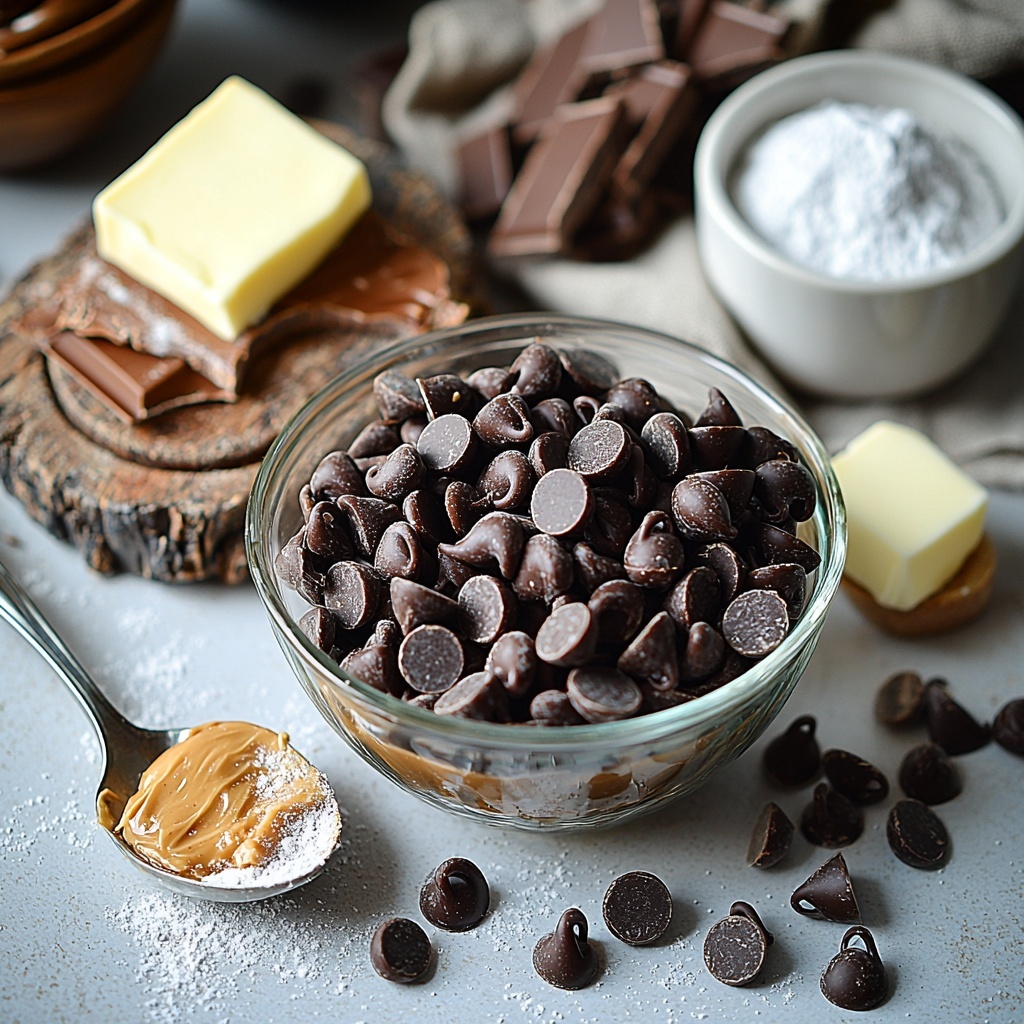
The magic of this Chocolate Swirl Peanut Butter Cups Recipe comes down to a few simple yet essential ingredients that blend perfectly to create a decadent treat. Each one brings something special—from the depth of the chocolate to the creamy smoothness of peanut butter, and just the right touch of sweetness to tie it all together.
- 14 ounces semi-sweet chocolate chips: The perfect balance of sweetness and a slightly bitter depth, essential for that classic chocolate peanut butter flavor.
- 1 cup creamy peanut butter: Smooth and rich, it adds a velvety texture and savory hint that complements the chocolate brilliantly.
- 6 tablespoons powdered sugar: Gives the peanut butter filling a subtle sweetness and fluffiness, ensuring every bite is just right.
- 4 tablespoons butter: Adds creaminess and helps the peanut butter mixture set smoothly without being dry or crumbly.
How to Make Chocolate Swirl Peanut Butter Cups Recipe
Step 1: Prepare Your Pan
Start by lining a muffin pan with cupcake liners. This makes it easy to fill and later remove the peanut butter cups without any sticky mess. Plus, it gives the cups a neat shape that’s perfect for sharing or gifting.
Step 2: Melt Half the Chocolate Chips
Using a microwave-safe bowl, melt half of the semi-sweet chocolate chips until smooth. Melt it gradually in short bursts, stirring in between, so the chocolate doesn’t seize. This glossy melted chocolate will form the delicious base layer for the cups.
Step 3: Form the Chocolate Base
Spoon the melted chocolate halfway into each cupcake liner. Be generous enough to create a sturdy bottom but don’t fill the liners too much—you want room for the peanut butter layer. Pop the tray into the freezer for 10 to 15 minutes until the chocolate layer is firm to the touch.
Step 4: Prepare the Peanut Butter Filling
While the chocolate base sets, combine the creamy peanut butter, powdered sugar, and butter in a bowl. Mix until the filling is completely smooth and silky with no lumps. This luscious mixture will be the heart of the peanut butter cups.
Step 5: Add the Peanut Butter Layer
Spoon the peanut butter filling over the firm chocolate base inside the liners. Smooth the tops gently to create an even layer. Return the pan to the freezer for another 10 minutes to help the filling firm up before sealing the cups with more chocolate.
Step 6: Melt the Remaining Chocolate and Seal
Now melt the remaining chocolate chips just like before until shiny and smooth. Pour the melted chocolate generously over each peanut butter layer, fully covering it. The top chocolate layer seals all the flavors inside, creating that classic peanut butter cup look and taste.
Step 7: Chill Until Set
Place the filled tray back into the freezer for about 30 minutes so the cups can fully set and become firm. Once they’re ready, they’ll hold their shape perfectly and be ready to enjoy.
How to Serve Chocolate Swirl Peanut Butter Cups Recipe
Garnishes
To add a little extra sparkle, consider sprinkling a pinch of flaky sea salt over the top chocolate layer before it fully hardens. It enhances the chocolate and peanut butter flavors wonderfully. For a festive vibe, you can also drizzle white chocolate or crushed nuts on top.
Side Dishes
These peanut butter cups make a delightful accompaniment to a hot cup of coffee or a cold glass of milk. For an indulgent dessert plate, pair them with fresh berries or a scoop of vanilla ice cream—the mix of creamy, nutty, and fruity creates an unforgettable treat.
Creative Ways to Present
For parties or gifting, present the cups in a decorative box with parchment paper or in small cellophane bags tied with colorful ribbons. You can even experiment by layering peanut butter cups inside a mason jar with other treats for a charming homemade gift.
Make Ahead and Storage
Storing Leftovers
Store any leftover Chocolate Swirl Peanut Butter Cups Recipe in an airtight container in the refrigerator. They’ll keep beautifully for 3 to 4 days, maintaining their texture and flavor so you can enjoy them fresh even after a few days.
Freezing
If you want to keep these treats on hand for longer, they freeze wonderfully. Place the peanut butter cups in a freezer-safe container separated by parchment paper and keep them frozen for up to 1 month. Just thaw them in the refrigerator before serving.
Reheating
Since these cups are best enjoyed chilled, we recommend removing them from the fridge about 10 minutes before eating to soften slightly. Avoid microwaving as the chocolate can melt unevenly and the texture might change.
FAQs
Can I use natural peanut butter for this recipe?
Natural peanut butter tends to have more oil and a looser consistency, which might affect how well the filling sets. If using natural peanut butter, consider chilling the mixture longer or adding a little extra powdered sugar to help it firm up.
Is it necessary to freeze the peanut butter cups, or can I refrigerate them instead?
Freezing helps the chocolate set quickly and achieve a firm texture. While refrigeration will work, it will take longer and the chocolate might not be as crisp. For best results, follow the freezing steps outlined in the recipe.
Can I substitute dark chocolate for semi-sweet chocolate chips?
Absolutely! Dark chocolate will give the peanut butter cups a richer, slightly more bitter edge which pairs beautifully with the sweet peanut butter filling. Just use the same amount indicated in the recipe.
How do I prevent the chocolate from seizing when melting?
Heat the chocolate gently in short 15-20 second intervals, stirring in between. Avoid any water contact with the chocolate, and use a clean, dry bowl. This slow melting process helps keep it smooth and shiny.
Can I make this recipe nut-free?
This particular recipe is centered on peanut butter, so substituting with a seed butter like sunflower seed butter can work as a nut-free alternative, but the flavor and texture will vary. Experiment and adjust the sweetness accordingly to match your preferences.
Final Thoughts
This Chocolate Swirl Peanut Butter Cups Recipe is truly a labor of love that’s both simple and rewarding. Every creamy, chocolatey bite brings an overwhelming sense of comfort and joy that homemade treats promise. I can’t wait for you to try making these at home and sharing them with your favorite people—you’re going to wonder why you hadn’t made these sooner!
Print
Chocolate Swirl Peanut Butter Cups Recipe
- Prep Time: 10 minutes
- Cook Time: 10 minutes
- Total Time: 35 minutes
- Yield: 12 servings
- Category: Dessert
- Method: No-Cook
- Cuisine: American
Description
Delicious homemade peanut butter cups featuring layers of creamy peanut butter sandwiched between smooth semi-sweet chocolate. These easy-to-make treats combine rich chocolate and sweetened peanut butter in a perfect balance, ideal for satisfying your sweet tooth with a classic favorite.
Ingredients
Chocolate Layer
- 14 ounces semi-sweet chocolate chips
Peanut Butter Filling
- 1 cup creamy peanut butter
- 6 tablespoons powdered sugar
- 4 tablespoons butter
Instructions
- Prepare Muffin Pan: Line your muffin pan with cupcake liners to create the cups that will hold your peanut butter and chocolate layers.
- Melt First Half of Chocolate: Place half of the semi-sweet chocolate chips in a microwave-safe bowl and heat until smooth and fully melted, stirring occasionally to avoid burning.
- Form Chocolate Base: Spoon the melted chocolate into the cupcake liners, filling them halfway. Place the pan in the freezer for 10-15 minutes to allow the chocolate to harden.
- Make Peanut Butter Filling: In a mixing bowl, combine the creamy peanut butter, powdered sugar, and butter. Mix thoroughly until the mixture is smooth and well blended.
- Add Peanut Butter Layer: Spoon the peanut butter mixture over the firm chocolate base in each cup. Return the pan to the freezer for another 10 minutes to set the filling.
- Melt Remaining Chocolate: Melt the remaining semi-sweet chocolate chips until smooth, using the microwave or a double boiler.
- Top with Chocolate: Pour the melted chocolate over the peanut butter layer to fully cover each peanut butter cup. Make sure they are well sealed.
- Final Chill: Place the cups back into the freezer and chill for around 30 minutes until completely firm and set.
- Serve: Once fully set, remove the peanut butter cups from the liners and enjoy your homemade treats.
Notes
- For best results, use creamy peanut butter for a smooth filling.
- Make sure chocolate is fully melted to get a glossy finish and proper setting.
- You can substitute semi-sweet chocolate chips with dark or milk chocolate based on preference.
- Store peanut butter cups in the refrigerator or freezer to maintain firmness.
- Allow cups to sit at room temperature a few minutes before eating for easier bite.


