“`html
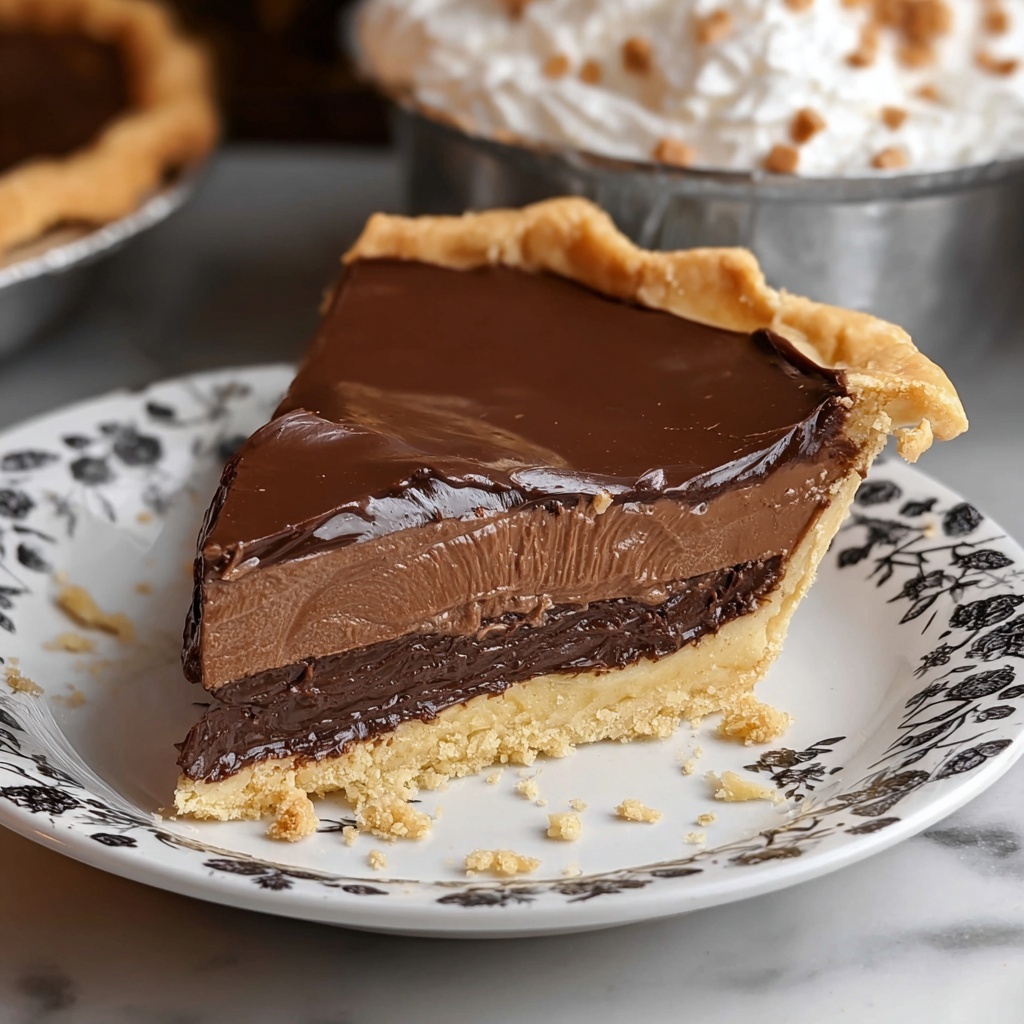
If you have a soft spot for classic desserts that instantly bring on cozy, nostalgic vibes, then you’re going to adore this Old-Fashioned Chocolate Pie Recipe. This luscious pie has the perfect balance of rich, creamy chocolate filling nestled in a flaky crust, creating that unmistakable taste of time-tested comfort. It’s the kind of dessert that feels like a warm hug from grandma, and it’s surprisingly straightforward to make with simple, everyday ingredients that come together beautifully to deliver pure chocolate happiness.
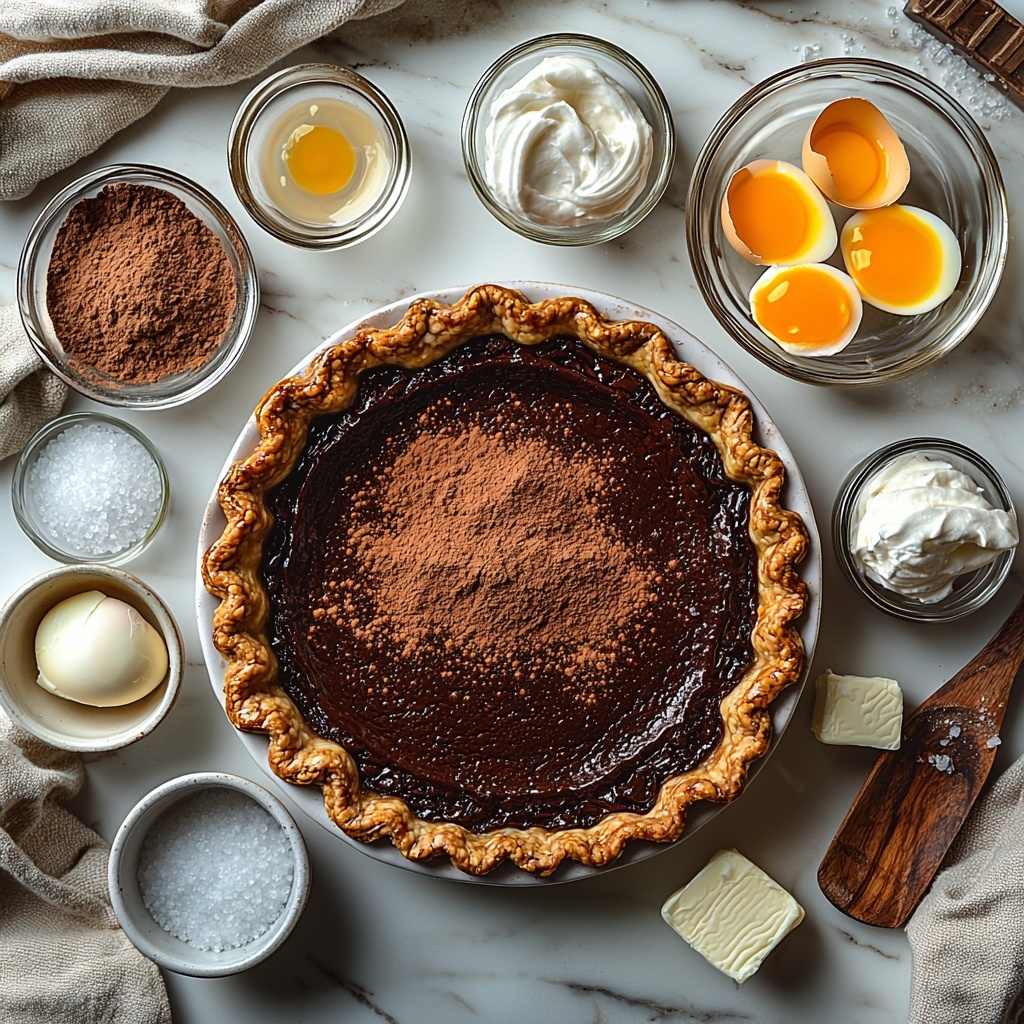
Ingredients You’ll Need
Every ingredient in this recipe plays a crucial role in building that silky texture and deep chocolate flavor. You’ll find these pantry staples make this pie both accessible and irresistible, whether you use a homemade or store-bought crust.
- 1 prepared pie crust: Whether homemade or store-bought, this provides the perfect buttery, flaky base that contrasts beautifully with the creamy filling.
- 1 1/4 cups granulated sugar: Essential for sweetness, it balances the cocoa’s slight bitterness perfectly.
- 1/4 cup unsweetened cocoa powder: Adds rich, deep chocolate flavor without extra fat or sugar.
- 1/4 teaspoon salt: Enhances the chocolate’s flavor and balances the sweetness.
- 2 1/2 cups whole milk: Creates the creamy, dreamy texture that makes this pie ultra-satisfying.
- 3 large egg yolks: These enrich the filling and help it set perfectly smooth and velvety.
- 2 tablespoons cornstarch: The unsung hero that thickens the filling to just the right consistency.
- 2 tablespoons unsalted butter: Adds a silky finish and smooth mouthfeel to the filling.
- 1 teaspoon vanilla extract: Provides a subtle warmth that rounds out the chocolate’s richness.
- Whipped cream (optional, for topping): A light, airy topper that lifts each bite with a creamy contrast.
How to Make Old-Fashioned Chocolate Pie Recipe
Step 1: Prepare the Pie Crust
Start by preheating your oven to 350°F (175°C). If you’re using a homemade pie crust, bake it first until it’s golden brown and crisp, then set it aside to cool completely. This ensures your crust stays flaky and doesn’t get soggy once the filling is poured in.
Step 2: Combine Dry Ingredients
In a medium saucepan, whisk together the granulated sugar, unsweetened cocoa powder, and salt. This combo forms the flavorful foundation of your chocolate filling, ensuring every spoonful tastes perfectly balanced.
Step 3: Add the Milk
Gradually whisk the whole milk into your dry ingredients, taking care to prevent any lumps. This step is key for a smooth custard base that will cook evenly with no unpleasant texture.
Step 4: Mix Egg Yolks and Cornstarch
In a separate bowl, whisk together the egg yolks and cornstarch until the mixture is completely smooth. This blend is crucial because it thickens the filling while providing that rich, creamy texture you’re aiming for.
Step 5: Combine and Cook the Mixtures
Slowly pour the egg yolk mixture into the milk mixture in your saucepan, stirring constantly over medium heat. This gradual mixing prevents the eggs from scrambling while helping to gently heat the custard.
Step 6: Thicken the Filling
Continue cooking the mixture, stirring constantly, until it thickens and comes to a boil, which usually takes about 8 to 10 minutes. This moment is very satisfying—the filling transforms from liquid to luscious chocolate pudding right before your eyes.
Step 7: Add Butter and Vanilla
Remove your saucepan from heat and stir in the unsalted butter and vanilla extract. This step enriches the filling, giving it a velvety finish and a subtle aromatic warmth that makes the chocolate shine even more.
Step 8: Pour Filling and Chill
Pour the silky filling into your cooled pie crust and smooth the top with a spatula. Then, let the pie cool completely at room temperature before refrigerating it for at least 3 hours or overnight so it can set firmly.
Step 9: Serve and Enjoy
Just before serving, add a generous dollop of whipped cream if you like. This Old-Fashioned Chocolate Pie Recipe is ready to impress with every decadent bite.
How to Serve Old-Fashioned Chocolate Pie Recipe
Garnishes
A little goes a long way when it comes to garnishing this pie. Freshly whipped cream is classic and adds lightness, but you can also sprinkle a dusting of cocoa powder or chocolate shavings on top for a fancy touch. If you’re feeling adventurous, a few fresh raspberries or a sprig of mint can bring a lovely pop of color and flavor contrast that complements the rich chocolate.
Side Dishes
Pairing Old-Fashioned Chocolate Pie with simple sides allows its flavor to truly shine. A scoop of vanilla ice cream or a small serving of fresh fruit salad works wonderfully. Coffee or a rich hot chocolate can also enhance the overall dessert experience, making it feel like a special treat at the end of any meal.
Creative Ways to Present
Want to jazz it up for a party or holiday gathering? Slice the pie and serve each piece with a drizzle of caramel or a sprinkle of toasted nuts for some texture. You can plate individual portions on pretty dessert dishes with a mint leaf garnish or even add a small edible flower for a stunning, elegant presentation that’s sure to wow your guests.
Make Ahead and Storage
Storing Leftovers
Old-Fashioned Chocolate Pie keeps beautifully refrigerated for 3 to 4 days. Be sure to cover it tightly with plastic wrap or store it in an airtight container to prevent the pie from absorbing any flavors from the fridge and to keep that filling nice and smooth.
Freezing
While the pie is best enjoyed fresh, you can freeze it to extend its life. Wrap it carefully in plastic wrap followed by aluminum foil and freeze for up to 1 month. When you’re ready to enjoy, thaw it overnight in the refrigerator to preserve that creamy texture.
Reheating
This pie is typically served chilled, so reheating isn’t necessary. However, if you prefer it slightly warmed, let it sit at room temperature for about 15 minutes before slicing, or briefly warm individual slices in the microwave for 10 seconds, but be careful not to overheat and ruin the beautiful custard texture.
FAQs
Can I use low-fat milk instead of whole milk?
Whole milk is recommended because it gives the filling a richer, creamier texture. Using low-fat milk may result in a thinner filling that lacks the same luxurious mouthfeel.
Is homemade pie crust necessary for this recipe?
Not at all! A store-bought pie crust works just fine and makes the recipe even easier. Just be sure to bake it fully before adding the filling for the best results.
Can I make this pie without cornstarch?
Cornstarch is essential for thickening the filling properly. Without it, the pie likely won’t set and may be too runny, so it’s best not to skip it.
How long does it take for the pie filling to thicken?
Once heated over medium heat with constant stirring, the filling thickens and comes to a boil in about 8 to 10 minutes, marking the perfect consistency.
What’s the best way to prevent lumps in the filling?
Whisking the milk slowly into the dry ingredients and continuously stirring over medium heat helps keep the filling silky smooth and lump-free.
Final Thoughts
There’s something truly magical about the simplicity and timelessness of this Old-Fashioned Chocolate Pie Recipe. It’s a dessert that invites you to slow down, savor each bite, and feel a little nostalgia wrapped in creamy chocolate goodness. Whether it’s for a special occasion or just a sweet treat to brighten any day, this pie is sure to become a beloved favorite in your kitchen. Give it a try—you’ll be handing down this chocolate treasure for years to come!
“`
Print
Old-Fashioned Chocolate Pie Recipe
- Prep Time: 20 minutes
- Cook Time: 15 minutes
- Total Time: 3 hours 35 minutes
- Yield: 8 servings
- Category: Dessert
- Method: Stovetop
- Cuisine: American
Description
This Old-Fashioned Chocolate Pie is a classic dessert featuring a rich, creamy chocolate filling made from scratch and set in a flaky pie crust. With a velvety custard base thickened by cornstarch and quietly sweetened with sugar and cocoa powder, it offers deep chocolate flavor with a smooth, luscious texture. Topped optionally with whipped cream, this pie is perfect for both casual family dinners and special occasions.
Ingredients
Pie Crust
- 1 prepared pie crust (store-bought or homemade)
Filling
- 1 1/4 cups granulated sugar
- 1/4 cup unsweetened cocoa powder
- 1/4 teaspoon salt
- 2 1/2 cups whole milk
- 3 large egg yolks
- 2 tablespoons cornstarch
- 2 tablespoons unsalted butter
- 1 teaspoon vanilla extract
Topping (Optional)
- Whipped cream
Instructions
- Preheat and Prepare Crust: Preheat your oven to 350°F (175°C). If using a homemade pie crust, bake it until golden brown and set aside to cool completely before filling.
- Mix Dry Ingredients: In a medium saucepan, whisk together the granulated sugar, unsweetened cocoa powder, and salt until evenly combined.
- Add Milk: Gradually whisk in the whole milk to the dry mixture, stirring continuously to avoid lumps and ensure a smooth base.
- Prepare Egg Mixture: In a separate bowl, whisk together the egg yolks and cornstarch until smooth and well blended.
- Combine Egg and Milk Mixtures: Slowly pour the egg yolk mixture into the milk and cocoa mixture while stirring constantly over medium heat to prevent curdling.
- Cook Filling: Continue cooking and stirring the mixture over medium heat until it thickens and reaches a boil, around 8-10 minutes. This step ensures the custard is thick and smooth.
- Add Butter and Vanilla: Remove the saucepan from heat and stir in the unsalted butter and vanilla extract until fully melted and combined.
- Fill Pie Crust: Pour the prepared chocolate filling into the cooled pie crust, smoothing the surface evenly with a spatula.
- Chill Pie: Let the pie cool to room temperature, then refrigerate for at least 3 hours or preferably overnight to allow the filling to set properly.
- Serve: Before serving, top the pie with whipped cream if desired for an extra creamy texture and visual appeal.
Notes
- Ensure the pie crust is completely cool before pouring in the filling to prevent it from becoming soggy.
- Constant stirring while cooking the filling is essential to prevent lumps and ensure a smooth custard.
- If you prefer a richer flavor, substitute part of the whole milk with half-and-half.
- For a dairy-free version, use a non-dairy milk alternative and vegan butter.
- Store leftovers covered in the refrigerator for up to 3 days.


