
If you have a soft spot for warm, comforting desserts that bring back memories of family gatherings and cozy autumn afternoons, this Classic Homemade Apple Pie Recipe is absolutely for you. With its crisp yet tender double crust and a luscious filling bursting with perfectly spiced apples, it’s the kind of pie that feels like a hug on a plate. Each slice offers that perfect harmony of sweet and tart, enhanced by cinnamon and nutmeg, making it a timeless dessert everyone will love.
Ingredients You’ll Need
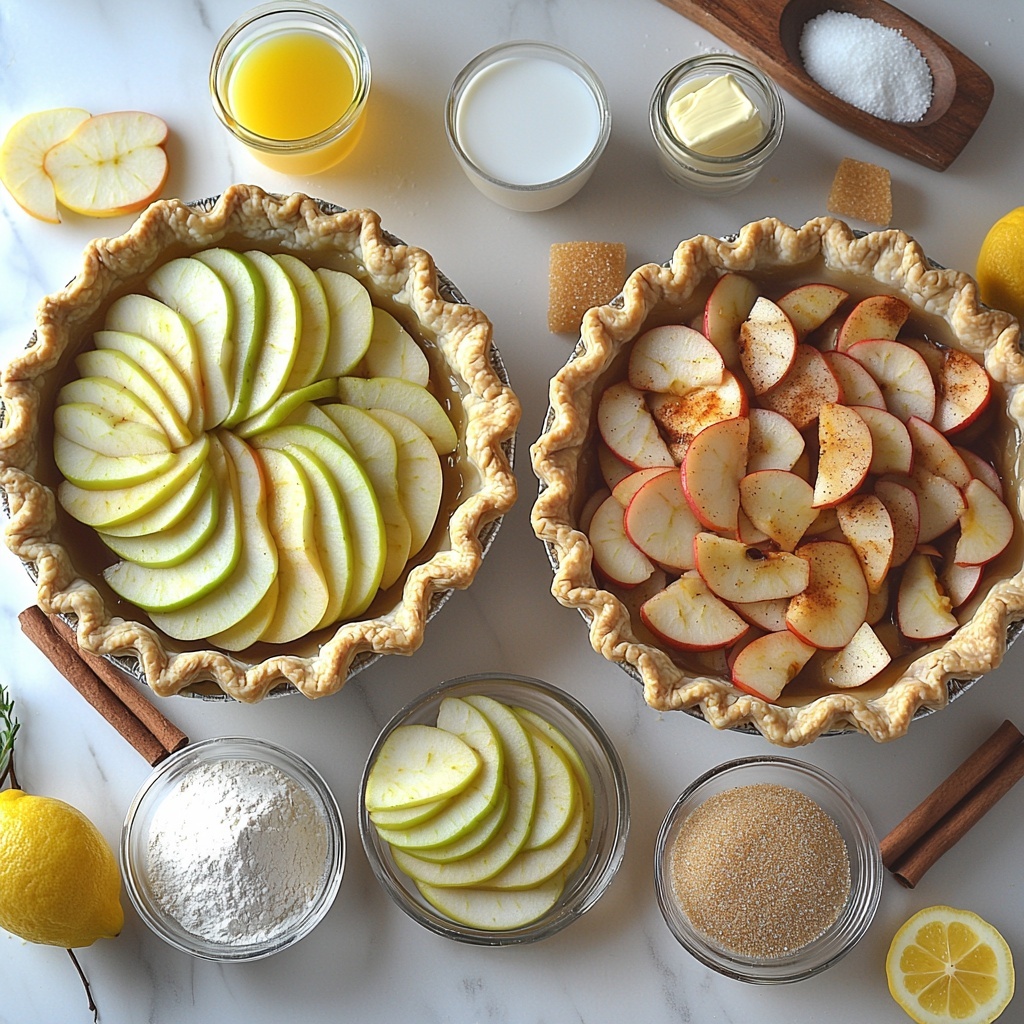
Gathering simple, quality ingredients is the secret to nailing this classic dessert. Each element plays its role to build incredible flavor, texture, and that inviting golden-brown finish.
- 1 double pie crust for a 9 inch pie: This forms the buttery, flaky base and cover that holds all the apple goodness.
- 6 cups thinly sliced peeled apples (Granny Smith or Honeycrisp): Tart Granny Smiths balance wonderfully with sweet Honeycrisps, giving complexity.
- 3/4 cup granulated sugar: Adds sweetness to the apples without overpowering their natural flavor.
- 1/4 cup packed brown sugar: Brings a deeper, caramel-like richness to the filling.
- 2 tablespoons all-purpose flour: Helps thicken the filling, keeping it from becoming too runny.
- 1 tablespoon cornstarch: An extra thickening agent ensuring the filling sets perfectly.
- 1 teaspoon ground cinnamon: Classic spice that enhances the apples with warm notes.
- 1/4 teaspoon ground nutmeg: Adds a subtle, nutty warmth to complement the cinnamon.
- 1/4 teaspoon salt: Balances the sweetness and brings out the depth of flavors.
- 1 tablespoon lemon juice: Keeps the apple slices fresh and bright while adding a slight tang.
- 1 teaspoon vanilla extract: Adds a mellow aroma and soft sweetness that rounds out the spices.
- 2 tablespoons unsalted butter, cut into small pieces: Dotting the filling with butter enhances richness and creates a silky finish.
- 1 tablespoon milk for brushing: Used to brush the crust for a beautiful golden shine.
- 1 tablespoon coarse sugar for topping: Sprinkling on top provides a delightful crunch and sparkle.
How to Make Classic Homemade Apple Pie Recipe
Step 1: Prepare Your Pie Crust
Preheat your oven to 425°F to get it nice and hot for baking. Roll out one of your pie crusts and gently fit it into a 9-inch pie dish. Trim any excess dough to create a clean edge. This step sets the stage for the filling and ensures your crust bakes evenly.
Step 2: Mix the Apple Filling
In a large bowl, combine the thinly sliced apples with granulated sugar, brown sugar, flour, cornstarch, cinnamon, nutmeg, salt, lemon juice, and vanilla extract. Toss everything together until the apples are evenly coated with this amazing spice and sweet mixture. This coating is what makes the filling bursting with flavor and perfectly thickened.
Step 3: Assemble the Pie
Pour your apple mixture evenly into the prepared pie crust and spread it out gently. Next, dot the top of the filling with the small pieces of butter—this little addition creates richness and adds to that luscious texture inside. Roll out the second crust and carefully place it over the apples. Trim, seal, and crimp the edges to lock all the deliciousness inside.
Step 4: Vent and Decorate the Top Crust
Cut several small slits in the top crust to allow steam to escape during baking—this prevents a soggy crust. Brush the crust with milk to give it a beautiful golden-brown hue once baked. Finally, sprinkle coarse sugar on top for that irresistible crunch and sparkle.
Step 5: Bake to Perfection
Bake your pie at 425°F for 20 minutes to jump-start that crust’s golden color. Then reduce the oven temperature to 375°F and bake for another 35 to 40 minutes until the crust shines golden brown and the filling is bubbling happily. If the edges of your crust brown too fast, gently cover them with foil to protect them from burning. Once baked, allow your pie to cool for at least 2 hours—this step is crucial to let the filling set so your slices come out clean and beautiful.
How to Serve Classic Homemade Apple Pie Recipe
Garnishes
While the pie is perfection on its own, topping each slice with a scoop of creamy vanilla ice cream adds that dreamy contrast between warm spices and cold sweetness. Alternatively, a dollop of lightly whipped cream sprinkled with cinnamon can elevate the experience, making it feel like a special occasion with every bite.
Side Dishes
This Classic Homemade Apple Pie Recipe pairs beautifully with a fresh cup of spiced tea or a robust coffee, perfect for cozying up. For a more indulgent dessert gathering, serve it alongside salty cheddar cheese slices—a beloved pairing in many traditions that plays on the sweet-savory balance.
Creative Ways to Present
Want to get creative? Try serving individual mini versions of this pie in ramekins or muffin tins for charming handheld treats. Or drizzle caramel sauce over each slice before serving to add an extra layer of decadence. Garnishing with toasted nuts like pecans or walnuts offers a pleasant crunch and nutty depth.
Make Ahead and Storage
Storing Leftovers
Once cooled completely, store any leftover slices in an airtight container in the refrigerator. They will stay delicious for 3 to 4 days, giving you plenty of time to enjoy the flavors without worry. The filling stays moist, and the crust remains delightfully tender.
Freezing
You can freeze either unbaked or fully baked pies. If freezing unbaked, wrap tightly in plastic and foil and bake straight from frozen, adding a few extra minutes to baking time. For baked pies, wrap securely and freeze for up to 1 month. Thaw overnight in the fridge before reheating or serving.
Reheating
Warm slices in a 350°F oven for 10 to 15 minutes to revive the crisp crust and soften the filling. Microwaving is faster but can make the crust soggy, so oven reheating is best if you want that freshly baked texture.
FAQs
Can I use other types of apples for this pie?
Absolutely! While Granny Smith and Honeycrisp are recommended for their balance of tartness and sweetness, feel free to mix different apples like Fuji or Gala to suit your taste. Just keep in mind the texture and sweetness level may vary slightly.
Do I need to peel the apples?
Peeling is preferred for a smoother, uniform filling and to avoid any tough bites. However, if you enjoy rustic texture and extra fiber, you can leave the skins on—just wash the apples thoroughly beforehand.
Why should I let the pie cool before slicing?
Allowing the pie to cool for at least 2 hours helps the filling set and thicken up. This way, your slices hold their shape and don’t become watery or runny when served.
Can I make this pie crust from scratch?
Definitely! Homemade pie crusts add an incredible buttery flakiness and personal touch. If you prefer convenience or are short on time, store-bought crusts work perfectly too.
How do I prevent the crust edges from burning?
If you notice the crust edges browning too quickly, simply cover them loosely with foil halfway through baking. This shields the edges while allowing the rest of the pie to bake thoroughly.
Final Thoughts
There’s nothing quite like the satisfaction of enjoying a slice of this Classic Homemade Apple Pie Recipe fresh from your own oven. It’s a fantastic way to fill your kitchen with heartwarming aromas and share a timeless dessert that brings smiles every time. I can’t wait for you to try it and make it your new go-to for every special occasion or simply a cozy night in!
Print
Classic Homemade Apple Pie Recipe
- Prep Time: 25 minutes
- Cook Time: 1 hour
- Total Time: 1 hour 25 minutes plus cooling
- Yield: 8 servings
- Category: Dessert
- Method: Baking
- Cuisine: American
- Diet: Vegetarian
Description
A classic American apple pie recipe featuring a tender, flaky double crust filled with a spiced mixture of thinly sliced Granny Smith and Honeycrisp apples. Perfectly baked to a golden brown with a bubbly, flavorful filling, this traditional dessert is a comforting favorite ideal for fall and any special occasion.
Ingredients
Pie Crust
- 1 double pie crust for a 9 inch pie
Apple Filling
- 6 cups thinly sliced peeled apples such as Granny Smith or Honeycrisp
- 3/4 cup granulated sugar
- 1/4 cup packed brown sugar
- 2 tablespoons all purpose flour
- 1 tablespoon cornstarch
- 1 teaspoon ground cinnamon
- 1/4 teaspoon ground nutmeg
- 1/4 teaspoon salt
- 1 tablespoon lemon juice
- 1 teaspoon vanilla extract
- 2 tablespoons unsalted butter, cut into small pieces
For Topping
- 1 tablespoon milk (for brushing)
- 1 tablespoon coarse sugar (for sprinkling)
Instructions
- Preheat Oven: Preheat your oven to 425°F (220°C) to prepare for baking the pie.
- Prepare Bottom Crust: Roll out one pie crust and place it in a 9-inch pie dish, trimming any excess dough around the edges for a neat fit.
- Make Apple Filling: In a large bowl, combine the thinly sliced apples with granulated sugar, brown sugar, all-purpose flour, cornstarch, ground cinnamon, ground nutmeg, salt, lemon juice, and vanilla extract. Toss gently until the apples are thoroughly coated with the mixture.
- Assemble Pie: Pour the apple mixture evenly into the prepared pie crust. Dot the top of the apples with small pieces of unsalted butter for richness.
- Top Crust: Roll out the second pie crust and carefully place it over the apple filling. Trim off any excess dough, then seal and crimp the edges securely to prevent leaks.
- Vent and Finish: Cut several small slits into the top crust to allow steam to escape during baking. Brush the top crust with milk and sprinkle evenly with coarse sugar to achieve a golden, textured finish.
- Bake Pie: Place the pie in the oven and bake at 425°F for 20 minutes. Then, reduce the oven temperature to 375°F (190°C) and continue baking for an additional 35 to 40 minutes until the crust is golden brown and the filling is bubbly.
- Prevent Over-browning: If the edges of the crust brown too quickly during baking, loosely cover them with foil to avoid burning.
- Cool Pie: Remove the baked pie from the oven and allow it to cool for at least 2 hours. This resting time helps the filling set, ensuring clean slices when served.
Notes
- For a richer flavor, combine tart apples with sweeter varieties like Granny Smith and Honeycrisp.
- Allow the pie to cool completely before slicing to achieve neat, clean slices.
- Serve warm or at room temperature with vanilla ice cream or whipped cream for a classic dessert experience.


