
If you’ve ever dreamed of filling your kitchen with the irresistible aroma of freshly baked loaf, then this Homemade Sourdough Bread Recipe is a must-try. Combining a bubbly, active starter with just a few essential ingredients and a bit of patience, you’ll create a rustic, crusty bread with a tender crumb that tastes like it belongs in a cozy bakery. This recipe invites you to connect with the timeless craft of sourdough baking, transforming simple flour and water into something truly magical and nourishing.
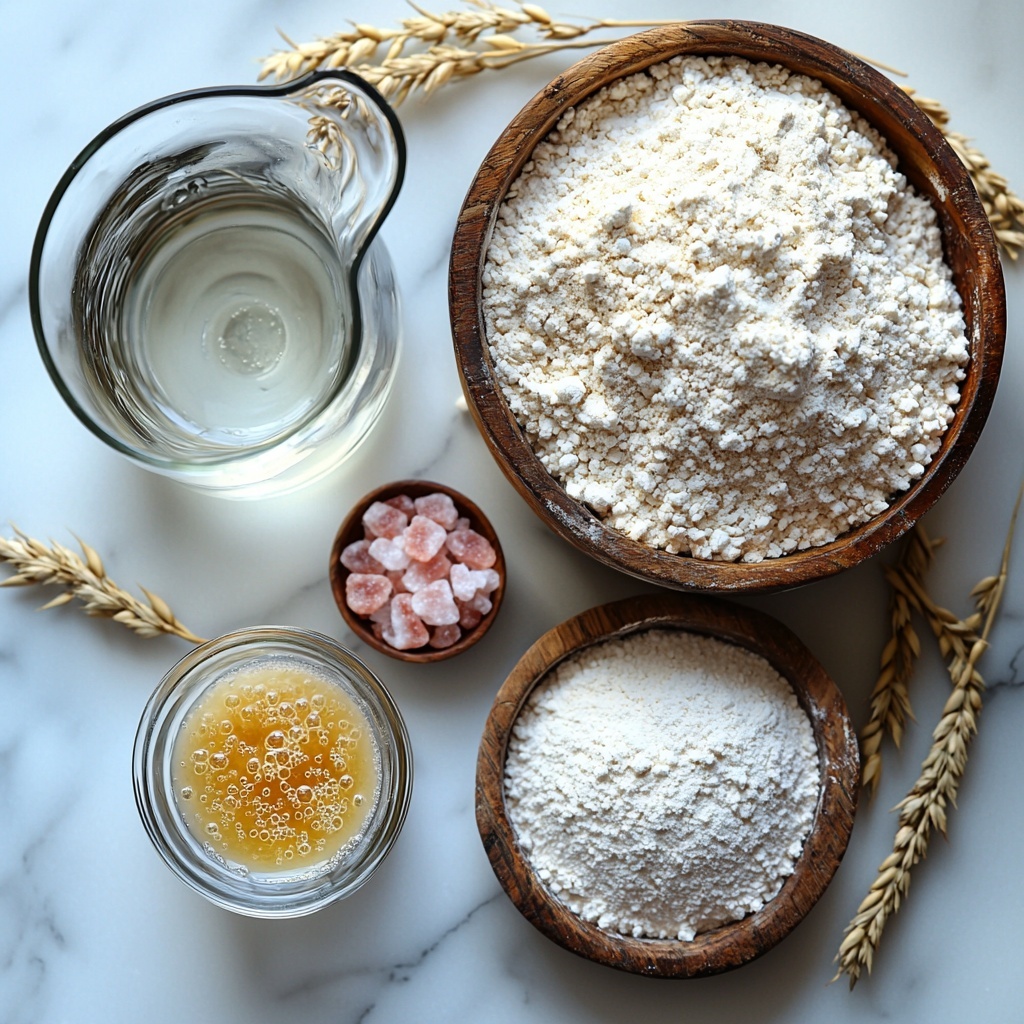
Ingredients You’ll Need
What’s beautiful about this Homemade Sourdough Bread Recipe is how few ingredients it calls for, yet each one plays a crucial role in building flavor, structure, and that perfect crust. From your lively starter to the carefully measured salt, every element contributes to making your bread irresistibly delicious.
- 50 to 100 grams ripe bubbly active starter (¼ cup to ½ cup): This is the heart of your bread, bringing natural fermentation and deep flavor.
- 350 to 375 grams warm water (well, 375 grams here): Hydrates the flour and activates your starter—warmth encourages fermentation, but adjust depending on humidity.
- 500 grams bread flour (or all-purpose flour, about 4 cups plus 2 tbsp): Gives your bread structure and chew; organic King Arthur Bread Flour is my favorite for a strong rise.
- 10 to 12 grams fine sea salt (pink Himalayan works great): Balances flavor and controls fermentation, helping your bread develop that perfect crust and crumb.
How to Make Homemade Sourdough Bread Recipe
Step 1: Feed Your Starter
The day you plan to bake, your starter should be revived and lively. If refrigerated, take it out the night before and feed it, then feed it again the morning of baking or a few hours prior. The starter is ready when it doubles in size and just starts to shrink—a sign it’s bubbly and eager to work its magic.
Step 2: Make The Dough
In a large mixing bowl, combine your active starter, warm water, and salt, stirring thoroughly. Add your bread flour and mix until a wet, sticky dough forms. Cover with a damp towel and let it rest for 30 minutes at room temperature—this rest helps the flour absorb water for a better texture.
Step 3: Stretches and Folds
With clean, wet hands, gently stretch one corner of the dough towards the center and fold it in, turning the bowl as you go. This gentle ‘massage’ encourages gluten development, turning the dough into a smooth, elastic ball over 2 hours with four rounds spaced every 30 minutes. Don’t worry if you have less time—two rounds still yield fantastic bread.
Step 4: Bulk Fermentation (Rest)
After stretching and folding, cover your dough and let it rise for 6 to 7 hours at room temperature (a bit longer if it’s cooler). You’ll know the bulk rise is done when the dough swells by half again in size, jiggles when you shake the bowl, and bubbles peek through—this is where flavor builds.
Step 5: Pre-shape
Carefully tip your dough onto a floured surface. Gently fold its edges toward the center while rotating it in a circle to create surface tension, which helps the dough hold its shape during the final rise.
Step 6: Bench Rest
Flip your dough ball seam-side down and let it rest for 30 minutes. Then, using your hands, pull the dough towards you slightly against the counter to tighten its shape further, rotating as you go. This step sets up a better structure for the final proof.
Step 7: Shaping
Prepare a proofing basket dusted generously with flour (or a bowl lined with a well-floured towel). Fold your dough gently into a tight round, place it smooth side down into the basket, and cover with plastic wrap or a towel. This encourages an even rise and convenient shaping.
Step 8: Cold Fermentation (Second Rise)
Refrigerate your dough overnight or up to 24 hours for the best flavor and airy crumb. If you’re short on time, letting it rise at room temperature for 1 to 2 hours until puffy is fine, but cold proofing really elevates this Homemade Sourdough Bread Recipe.
Step 9: Baking
Preheat your oven to 450°F and prep your Dutch oven with parchment paper. Carefully turn your dough onto the parchment, score it with a sharp blade (an X is classic but get creative!), and transfer the dough into the Dutch oven. Bake with the lid on for 30 minutes, then remove the lid, lower the heat to 400°F, and bake uncovered for 20 to 30 more minutes until golden and hollow-sounding when tapped.
Step 10: Cooling
Remove from the oven and transfer the bread to a wire rack. Let it cool for at least one hour before slicing—this resting helps the crumb finish setting and enhances flavor.
How to Serve Homemade Sourdough Bread Recipe
Garnishes
Because this Homemade Sourdough Bread Recipe has such a beautiful crust and crumb, simple garnishes like a brush of high-quality olive oil or a sprinkle of flaky sea salt let its flavor shine. Fresh herbs or garlic butter can also be wonderful for an extra touch.
Side Dishes
Pair your sourdough slices with hearty soups, fresh salads, or rich cheeses. It’s especially splendid alongside a warm tomato soup or a vibrant roasted vegetable spread, making every meal feel cozy and special.
Creative Ways to Present
Turn your homemade loaf into croutons, thick toast with smashed avocado, or even sandwiches with gourmet fillings. Serve toasted slices topped with honey and ricotta for breakfast or use your bread bowl as an edible vessel for chili—there’s no end to the delicious possibilities.
Make Ahead and Storage
Storing Leftovers
Keep your leftover sourdough bread in a paper bag or wrapped loosely in a clean kitchen towel at room temperature. This method preserves the crust and keeps the bread fresh for 3 to 4 days without becoming soggy or stale.
Freezing
If you want to savor this Homemade Sourdough Bread Recipe later, slice it and freeze it in an airtight container or freezer bag for up to 3 months. When you’re ready, toast slices directly from the freezer or thaw at room temperature.
Reheating
For the best texture, reheat leftover bread in a preheated 350°F oven for 10 to 15 minutes wrapped in foil to soften, or unwrap for a crisper crust. Microwaving isn’t ideal as it can make bread gummy.
FAQs
What if my starter isn’t very active?
If your starter isn’t bubbly or doubling in size, it needs more frequent feedings and warmth to revive. Try feeding it once every 12 hours at room temperature until it’s lively enough to use in the recipe.
Can I use all-purpose flour instead of bread flour?
Absolutely! All-purpose flour works fine, though bread flour gives better gluten development. Using organic King Arthur Bread Flour as recommended will create a chewier, more structured loaf.
How long should I let the dough rise during bulk fermentation?
Typically 6 to 7 hours at room temperature works well, but if your kitchen is colder, give it 8 to 9 hours. The dough should grow by about 50% to 70% and show bubbles on the surface.
Why do you suggest a cold fermentation?
Cold fermentation slows fermentation, deepens flavor, and improves the crumb’s texture, making the bread lighter and airier. It’s worth the wait if you can plan ahead.
What if I don’t have a Dutch oven?
You can bake your bread on a heavy baking stone or sheet and create steam by placing a pan with water in the oven. Covering with a large bowl for the first part of baking also helps trap steam.
Final Thoughts
Baking bread at home is an incredibly rewarding ritual, and this Homemade Sourdough Bread Recipe makes it accessible while honoring tradition. With basic ingredients and a bit of time, you’ll create something remarkable that brings warmth to any table. Trust me, once you taste your own crusty, flavorful loaf, you’ll wonder how you ever lived without it.
Print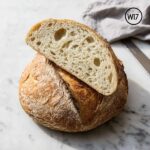
Homemade Sourdough Bread Recipe
- Prep Time: 30 minutes (excluding starter feeding)
- Cook Time: 50-60 minutes
- Total Time: Approximately 29 hours (including starter feeding and fermentation times)
- Yield: 28 servings (1 large loaf)
- Category: Bread
- Method: Baking
- Cuisine: French/American artisan
- Diet: Vegetarian
Description
This classic Sourdough Bread Recipe guides you through the art of making a beautifully crusty and airy loaf using traditional sourdough starter. With detailed steps including feeding the starter, stretching and folding the dough, bulk fermentation, and a cold proof for enhanced flavor, this recipe produces a rustic loaf perfect for sandwiches, toasts, or simply enjoyed with butter.
Ingredients
Sourdough Starter and Dough
- 50 to 100 grams ripe bubbly active starter (¼ cup to ½ cup; preferably 100 grams)
- 350 to 375 grams warm water (375 grams recommended; less in humid weather)
- 500 grams bread flour (or all-purpose flour – approximately 4 cups plus 2 tablespoons; preferably organic King Arthur Bread Flour)
- 10 to 12 grams fine sea salt (such as pink Himalayan sea salt)
Instructions
- Feed Your Starter: Remove your starter from the refrigerator the night before and feed it. Feed it again the morning you plan to make your dough or at least a few hours prior. The starter is ready to use when it has doubled in size before shrinking back.
- Make The Dough: In a large mixing bowl, combine the active starter with warm water and sea salt, mixing well. Add the bread flour and mix until a wet, sticky dough forms and the ingredients are fully incorporated. Cover with a damp towel and let rest for 30 minutes at room temperature.
- Stretches and Folds: Using a wet hand, gently pull and fold corners of the dough into the center, rotating around the bowl 4-5 times until the dough forms a ball. Rest covered for 30 minutes. Repeat this folding and resting process 3 more times at 30-minute intervals, covering after each. If time is limited, performing twice is acceptable.
- Rest (Bulk Fermentation): After stretching and folding, cover the bowl with a damp towel and lid to prevent drying and let the dough rise at room temperature for 6-7 hours or up to 8-9 hours if cooler. The dough should increase 50-70% in volume, appear bubbly, and jiggle when shaken.
- Pre-shape: Turn the dough out onto a lightly floured surface. Gently fold the dough into a round shape by tucking the edges toward the center, rotating as you fold. Use a bench scraper if available to create surface tension.
- Bench Rest: Flip the dough ball over and let it rest uncovered for 30 minutes. Then, pull edges towards you to tighten the ball, rotating and repeating to enhance tension.
- Shaping: Prepare a proofing basket by heavily dusting with flour or line a medium mixing bowl with a floured clean towel. Shape the dough into a tight ball again by folding edges to the center, rotate continuously, and place smooth side down into the basket or bowl. Cover with plastic wrap, shower cap, or towel.
- Cold Fermentation (Second Rise): Refrigerate the dough overnight or for 18-24 hours to develop flavor and texture. If baking same day, let dough rest 1-2 hours at room temperature until puffy and spread slightly.
- Baking Preparation: Preheat your oven to 450°F (232°C). Cut parchment paper to fit your Dutch oven.
- Transfer Dough: Gently turn the dough onto the parchment paper. Score the dough’s top with a sharp blade or knife to allow proper expansion during baking.
- Bake Covered: Using the parchment paper, lift and place the dough into the preheated Dutch oven. Cover with its lid and bake at 450°F for 30 minutes.
- Bake Uncovered: After 30 minutes, remove the lid, reduce oven temperature to 400°F (204°C), and bake uncovered for an additional 20 to 30 minutes, or until the crust is deeply browned and the internal temperature reaches 205–210°F (96–99°C).
- Cool: Remove the bread from the Dutch oven and transfer it to a wire rack. Allow it to cool for at least 1 hour before slicing to finish setting the crumb.
Notes
- For best flavor and texture, use the cold fermentation method with overnight refrigeration.
- The quantity of water may vary depending on humidity and flour absorption; adjust to obtain a wet, sticky dough.
- Stretch and folds help develop gluten structure without kneading.
- Use a Dutch oven or heavy covered pot to mimic steam oven conditions for a crisp crust.
- Allow the bread to cool completely before slicing to avoid gummy texture.
- The internal temperature of 205-210°F indicates fully baked bread.
- The amount of starter used can be adjusted between 50-100 grams depending on fermentation time desired.


