
If you are looking for a fun, festive, and utterly delightful treat to add a touch of magic to your holiday drinks or desserts, this DIY Peppermint Candy Spoons Recipe is a total game-changer. These charming peppermint spoons bring together the nostalgic crunch of classic Starlight Peppermint candies with the creamy sweetness of chocolate (if you choose) and holiday sprinkles. They are not only beautiful but also insanely easy to make, perfect for gifting or adding that special touch to your winter gatherings.
Ingredients You’ll Need
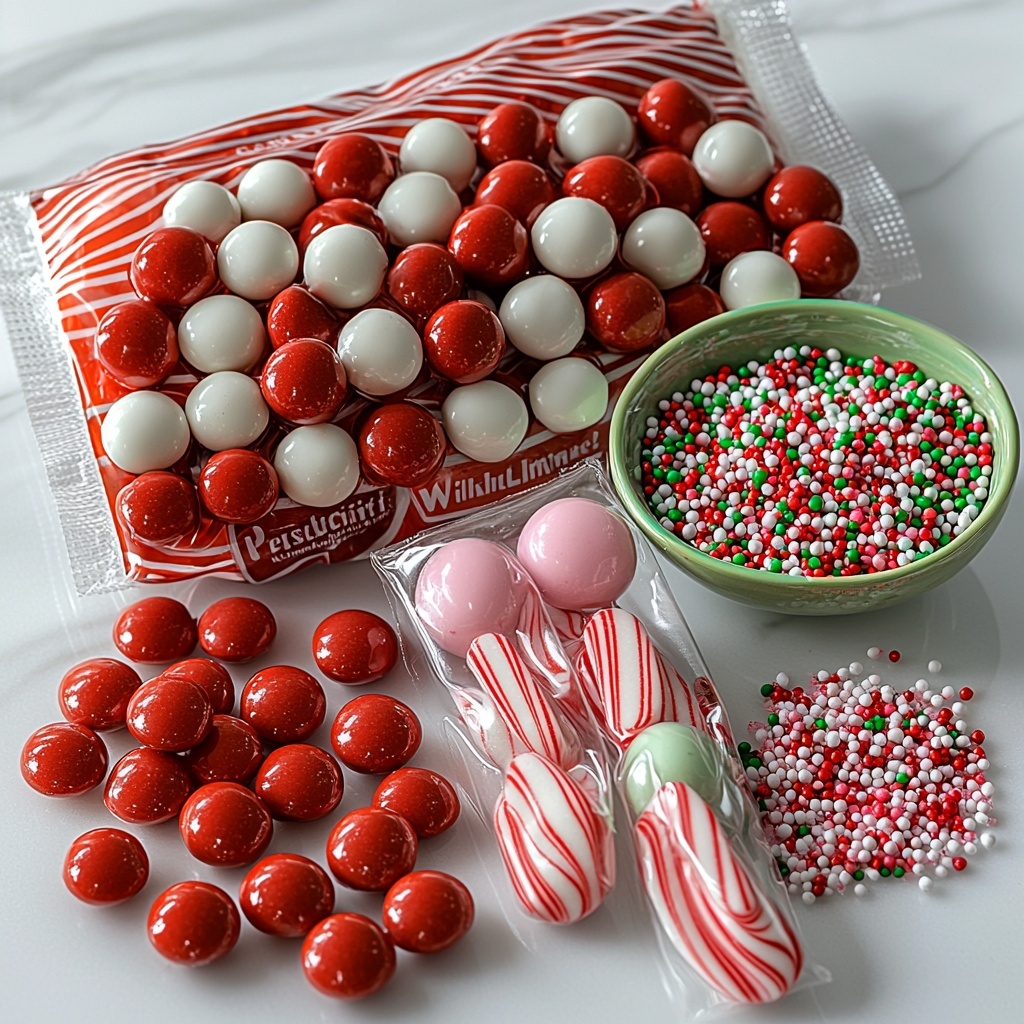
The best part about this DIY Peppermint Candy Spoons Recipe is just how simple and accessible the ingredients are. Each component plays a key role in achieving that perfect balance of flavor, crunch, and festive flair.
- 1 bag Starlight Peppermint Candy: These classic peppermint discs bring the signature cool, refreshing flavor and are easy to crush into the perfect spoon-fitting bits.
- 1 bag Wilton Candy Melts: Optional but highly recommended for adding a smooth chocolate coating that pairs beautifully with peppermint and gives the spoons an elegant finish.
- Holiday Sprinkles: A colorful and fun garnish that adds festive cheer and gives a delightful crunch to the chocolate-dipped ends.
How to Make DIY Peppermint Candy Spoons Recipe
Step 1: Preheat the Oven
Start by heating your oven to 300 degrees Fahrenheit. This temperature is just right to gently melt the crushed peppermint candies without burning them, ensuring a smooth and glossy finish to your spoons.
Step 2: Crush the Peppermints
Place the Starlight Peppermint candies into a ziplock bag and give them a good crush using a kitchen mallet or rolling pin. The goal is to break them into small shards that will melt evenly but still retain a little bite for texture.
Step 3: Fill the Spoon Mold
Using a teaspoon, carefully fill the spoon-shaped cavities of your mold with the crushed peppermint. Make sure to pack extra peppermint at the top of the spoon and especially at the neck where the handle meets the spoon head—this area tends to be fragile and extra reinforcement helps avoid breakage.
Step 4: Melt the Peppermint in the Oven
Pop the filled mold into the oven and keep a close eye on it. It usually takes around 10 minutes for the candies to fully melt, but ovens can vary. When the peppermint looks mostly melted (around 8 minutes in), you can add a bit more crushed peppermint to any thin spots for sturdiness, then return the mold to the oven for a few more minutes.
Step 5: Cool Completely
Take the mold out and let the peppermint spoons cool completely. This is essential because it allows the candy to harden and set properly, giving you that satisfying snap when you remove them from the mold.
Step 6: Remove from Mold
Gently separate the sides of the mold and carefully pop out the candy spoons. If any break during this step, don’t worry—just add a little more crushed peppermint to the broken spots and remelt briefly to patch them up.
Step 7: Optional Chocolate Dip and Sprinkles
If you want to take these spoons to the next level, melt your Wilton Candy Melts according to the package directions. Dip the spoon ends into the melted chocolate, then immediately dip into holiday sprinkles. Lay the spoons on wax paper and allow the chocolate to dry thoroughly before use or gifting.
How to Serve DIY Peppermint Candy Spoons Recipe
Garnishes
These peppermint spoons are a beautiful garnish all on their own! Try adding a fresh sprig of mint or a cinnamon stick alongside the spoon when serving in hot cocoa or coffee for an elegant, aromatic flourish.
Side Dishes
Pair your peppermint spoons with holiday desserts like rich chocolate cake, creamy vanilla pudding, or fluffy marshmallows. The cooling peppermint flavor complements rich, creamy sweets fantastically.
Creative Ways to Present
For a gift or party presentation, wrap each spoon in a small cellophane bag tied with festive ribbon. Or, set up a hot chocolate bar with these spoons nestled among mugs, whipped cream, and chocolate shavings for a fully interactive treat station your guests will adore.
Make Ahead and Storage
Storing Leftovers
Store your peppermint candy spoons in an airtight container at room temperature for up to 3-4 days. Keeping them out of direct sunlight and moisture will protect their crisp texture and brilliant flavor.
Freezing
It is not recommended to freeze these peppermint spoons, as moisture from thawing can cause them to lose their crunch and potentially become sticky or soggy.
Reheating
There is no need to reheat peppermint candy spoons. If you want to reuse them in drinks or desserts, simply add them directly as a garnish or stirrer—they will gently melt into hot liquids on their own.
FAQs
Can I use a different type of peppermint candy?
While Starlight Peppermint candies work best for melting and shaping, you can experiment with other peppermint candies as long as they melt well. Just be aware that texture and sweetness might vary slightly.
Do I need a special mold to make these spoons?
A spoon-shaped silicone mold is ideal because it allows easy removal and gives your spoons a perfect shape. Without a mold, it’s tough to achieve the same results, but you could try shaping the melted peppermint on parchment paper if you’re feeling creative.
Can I skip the chocolate melts?
Absolutely! The chocolate dip is optional but adds a lovely creaminess and color contrast. The peppermint spoons are just as delicious and festive on their own.
How do I prevent the spoons from breaking?
Make sure to pack extra crushed peppermint at the spoon’s neck, which is the most fragile part. Also, avoid handling them roughly when removing from the mold and throughout use.
Can I make these spoons ahead of time for a party?
Yes! Make them a day or two in advance and store properly in an airtight container. They will keep well for 3-4 days without any loss of flavor or texture.
Final Thoughts
I can’t recommend this DIY Peppermint Candy Spoons Recipe enough for anyone looking to add a bit of holiday sparkle and deliciousness to their kitchen creations. They’re simple, charming, and oh-so-tasty—a little labor of love that pays off every single time. Give it a try and watch these peppermint spoons become your new festive obsession!
Print
DIY Peppermint Candy Spoons Recipe
- Prep Time: 5 minutes
- Cook Time: 10 minutes
- Total Time: 15 minutes
- Yield: 8 servings (8 candy spoons)
- Category: Dessert
- Method: Baking
- Cuisine: American
Description
These DIY Peppermint Candy Spoons are a delightful and festive treat perfect for the holiday season. Made by melting crushed peppermint candies in a spoon mold and optionally dipped in chocolate with sprinkles, they make charming edible spoons ideal for stirring hot cocoa or as a sweet snack. The easy-to-follow recipe allows you to create colorful, minty, and crunchy spoons in just 15 minutes.
Ingredients
Base Ingredients
- 1 bag Starlight Peppermint Candy (about 12 oz)
- 1 bag Wilton Candy Melts (approximately 10 oz, choice of color/flavor)
- Holiday Sprinkles (to taste, for decoration)
Instructions
- Preheat Oven: Preheat your oven to 300 degrees Fahrenheit to prepare for melting the peppermint candies evenly without burning them.
- Crush Peppermints: Place the Starlight Peppermint Candy into a ziplock bag and crush them into small pieces using a kitchen mallet or rolling pin, ensuring they’re fine enough to melt evenly in the mold.
- Fill Spoon Mold: Using a teaspoon, fill each cavity of the spoon mold with the crushed peppermint. Apply extra crushed peppermint around the top of the spoon and at the neck (where the spoon joins the handle) since these areas are prone to breaking.
- Melt Peppermint: Place the filled mold into the oven for about 10 minutes. After approximately 8 minutes, check the melting progress. When the peppermint is partially melted, add more crushed peppermint to fill in any thin or sparse areas. Return to the oven for a few more minutes until fully melted and level.
- Cool Completely: Remove the mold from the oven and allow the peppermint candy spoons to cool thoroughly so they harden properly.
- Remove from Mold: Carefully separate the sides of the mold and gently remove the hardened peppermint candy spoons. If any spoons break, you can patch them by adding more crushed peppermint and reheating briefly.
- Optional Chocolate Dip: Melt the Wilton Candy Melts according to package instructions. Dip the handles or ends of the peppermint spoons into the melted candy melts, then immediately dip into holiday sprinkles for decoration. Place the spoons on wax paper and let the chocolate harden fully before serving or storing.
Notes
- Use caution when removing spoons from the mold to avoid breakage, particularly around the neck area.
- Adjust the amount of crushed peppermint as needed to ensure spoons are sturdy.
- Chocolate dipping is optional but adds flavor and festive flair.
- These candy spoons are perfect for stirring hot drinks or as a sweet holiday party favor.
- Store candy spoons in an airtight container at room temperature to prevent them from becoming sticky.


