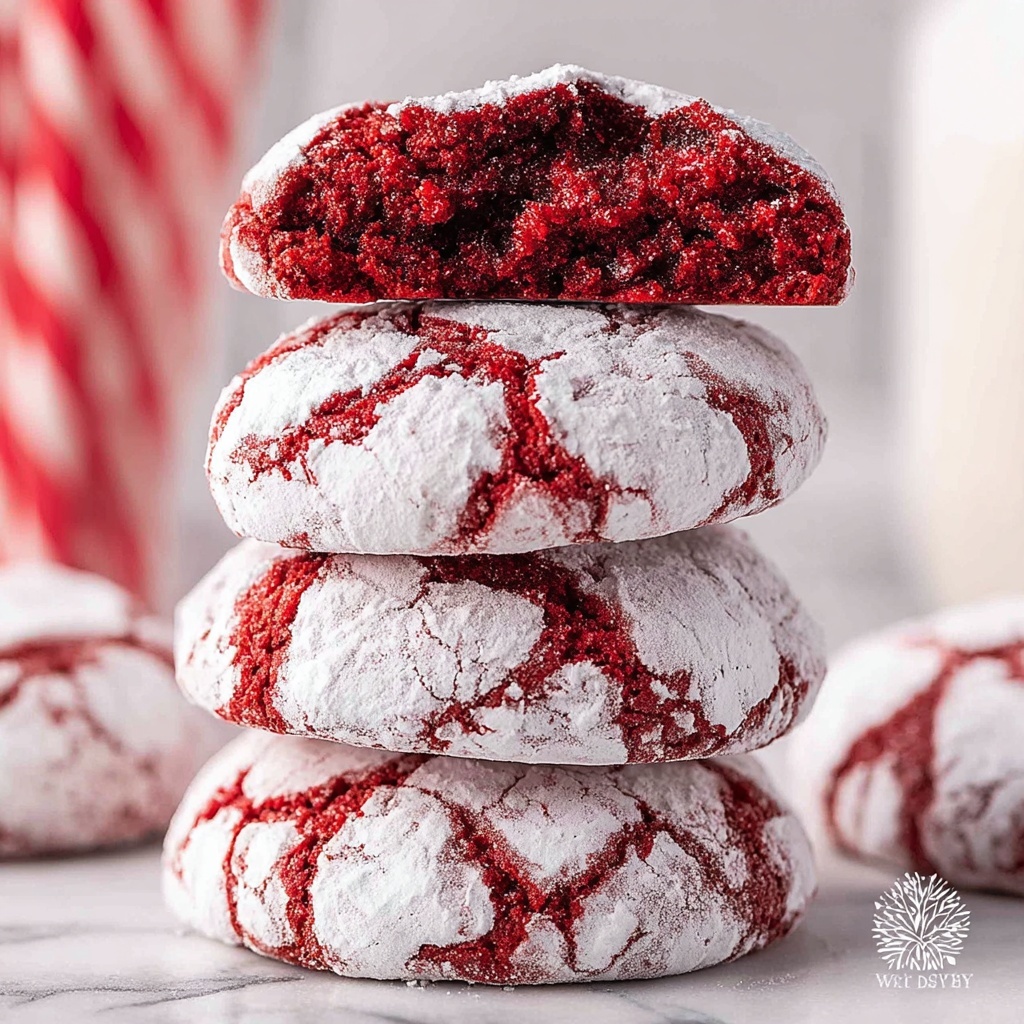
If you are on the lookout for a dessert that combines simplicity, rich flavor, and a nostalgic twist, this Red Velvet Cake Mix Cookies Recipe is an absolute must-try. These cookies capture the vibrant red hue and velvety texture of classic red velvet cake but transform them into perfectly portioned, chewy delights that you can whip up in no time. Whether you’re baking for a special occasion or craving a sweet treat after dinner, this recipe invites you to enjoy everything you love about red velvet with minimal fuss and maximum joy.
Ingredients You’ll Need
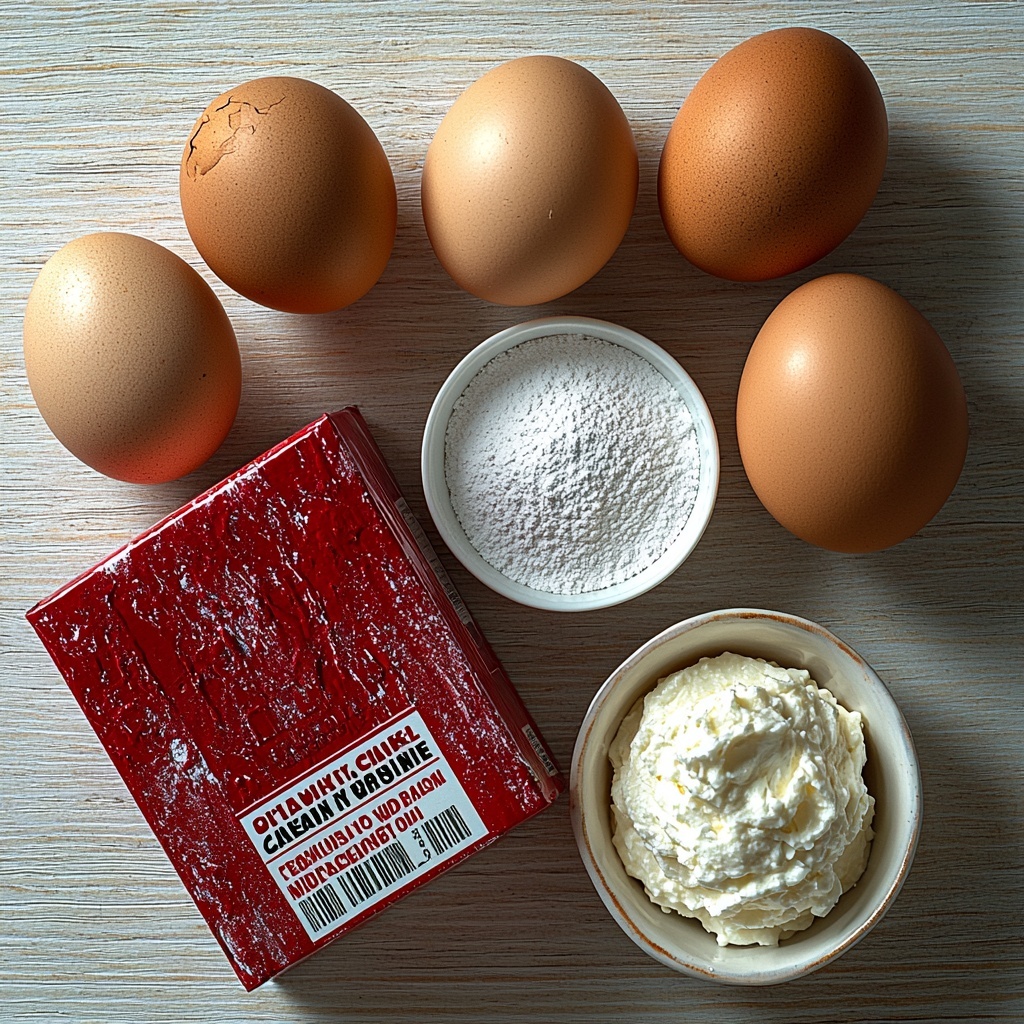
This recipe keeps things wonderfully simple but every ingredient plays a vital role in creating those soft, chewy cookies with that unmistakable red velvet look and taste. Each component brings texture, richness, and flavor — plus, a little powdered sugar adds that classic cookie coating that’s just irresistible.
- 15.25 ounce (1) box red velvet cake mix: The key to that iconic red color and signature subtle cocoa flavor.
- 2 large eggs: They bind the ingredients together while helping the cookies rise just right.
- ½ cup whipped cream cheese spread: Adds creamy moisture and deepens the classic red velvet tang.
- ½ cup powdered sugar: Perfect for rolling the cookie dough to give a lovely, delicate coating that sweetens and contrasts the rich dough.
How to Make Red Velvet Cake Mix Cookies Recipe
Step 1: Prepare Your Oven and Baking Sheets
To start off, preheat your oven to 350 degrees Fahrenheit—this moderate heat ensures your cookies bake evenly and develop that perfect texture. Line two half-sheet baking pans with parchment paper; this prevents sticking and helps with easy cleanup. Getting these steps right sets you up for baking success.
Step 2: Mix the Dough
Using a stand or hand mixer, beat together the red velvet cake mix, eggs, and whipped cream cheese spread in a large bowl. Do this for about 1 to 2 minutes until you have a soft, sticky dough. This stage is where your batter transforms into cookie dough — creamy, vibrant, and ready for the next step.
Step 3: Prep the Powdered Sugar Bowl
While the dough is coming together, pour the powdered sugar into a shallow bowl. This will be used shortly to coat your cookies, adding a sweet and snowy finish that makes every bite delightful.
Step 4: Shape and Sugar-Coat Your Cookies
Using a 1 ½ tablespoon cookie scoop, drop balls of dough directly into the powdered sugar. Roll each ball around to coat evenly, then shape into smooth, round balls. This coating is not only beautiful but gives your cookies a slight crunchy outer texture that balances the softness inside.
Step 5: Bake to Perfection
Place your sugar-coated cookie balls about 1 to 2 inches apart on your prepared baking sheet; they’ll expand slightly while baking. Pop the pans into your preheated oven and bake for 8 to 11 minutes, or until the edges are just set. The key here is to avoid overbaking so the centers remain wonderfully tender.
Step 6: Cool and Serve
Once baked, let the cookies cool on the pans for 3 to 5 minutes, allowing them to firm up slightly. After that, transfer them to a cooling rack for complete cooling or serve them warm if you can’t resist that fresh-from-the-oven goodness.
How to Serve Red Velvet Cake Mix Cookies Recipe
Garnishes
These cookies are gorgeous on their own, but you can elevate the experience by dusting a little extra powdered sugar or sprinkling mini white chocolate chips on top right after baking. Fresh berries on the side add a burst of natural sweetness and color contrast too.
Side Dishes
Pair these cookies with a cold glass of milk, a cup of rich hot chocolate, or even a scoop of vanilla ice cream for a dessert plate that’s as comforting as it is indulgent. The creamy ice cream cuts through the sweetness and echoes the cream cheese undertones beautifully.
Creative Ways to Present
For a festive party, arrange the cookies on a tiered cake stand alongside red and white macarons or mini cupcakes for a delightful red velvet-themed dessert board. Alternatively, sandwich these cookies with more whipped cream cheese spread for a scrumptious cookie sandwich twist.
Make Ahead and Storage
Storing Leftovers
Keep your leftover cookies fresh by storing them in an airtight container at room temperature. They’ll stay soft and delicious for about 3 to 4 days. Avoid the fridge as it can dry out the cookies, robbing them of their signature chewy texture.
Freezing
If you want to make a batch ahead of time, you can freeze the cookie dough balls before baking. Simply roll them in powdered sugar as instructed, freeze them on a baking sheet, then transfer to a freezer bag. When ready, bake straight from frozen, adding a minute or two to the baking time.
Reheating
To enjoy your cookies warm after storage, pop them in the microwave for about 10 to 15 seconds or warm them in a preheated oven at 300 degrees Fahrenheit for 3 to 4 minutes. This revives their softness and highlights the delightful cream cheese flavor all over again.
FAQs
Can I substitute the whipped cream cheese spread with regular cream cheese?
Yes, you can use softened regular cream cheese instead. Just make sure it’s whipped or beaten smoothly to blend well with the cake mix for that same creamy texture.
Why is powdered sugar used to coat the cookies?
Rolling the dough balls in powdered sugar before baking creates a delicate outer crust with a subtle crunch and a beautiful contrast to the soft, moist interior. It also adds an extra touch of sweetness that complements the tangy cream cheese.
Can I use a different cake mix flavor for this recipe?
While the magic of these cookies comes from the distinctive red velvet flavor, you can experiment with other cake mixes like chocolate or vanilla for fun variations. Just keep in mind the cream cheese addition works best with red velvet or similar flavors.
Are these cookies gluten-free?
Typically, store-bought red velvet cake mixes contain gluten. If you want a gluten-free version, look for a certified gluten-free red velvet cake mix and ensure the other ingredients are gluten-free as well.
How do I know when the cookies are done baking?
Look for edges that are set and lightly firm, while the centers will still seem soft but not wet. Avoid overbaking to keep the chewy texture that makes these cookies so special.
Final Thoughts
If you want to impress your friends or simply treat yourself to something uniquely delicious, the Red Velvet Cake Mix Cookies Recipe is an absolute winner. It’s quick to make, needs just a handful of ingredients, and delivers that unforgettable red velvet flavor in a chewy, sugar-coated cookie form. Do not wait to try it—this recipe could easily become your new favorite go-to for festive treats or everyday indulgence.
Print
Red Velvet Cake Mix Cookies Recipe
- Prep Time: 10 minutes
- Cook Time: 9 minutes
- Total Time: 19 minutes
- Yield: 18 cookies
- Category: Dessert
- Method: Baking
- Cuisine: American
Description
Delight in these easy-to-make Red Velvet Cake Mix Cookies—a perfect blend of moist red velvet flavor with a creamy, sweet cream cheese coating. This recipe uses a boxed cake mix, eggs, and whipped cream cheese spread to create soft, chewy cookies rolled in powdered sugar for an irresistible finish. Ideal for when you want a quick and festive treat without the fuss of baking a full cake.
Ingredients
Dry Ingredients
- 15.25 ounce (1 box) red velvet cake mix
- ½ cup powdered sugar
Wet Ingredients
- 2 large eggs
- ½ cup whipped cream cheese spread
Instructions
- Preheat oven: Preheat your oven to 350 degrees Fahrenheit (175 degrees Celsius). Line two half-sheet baking pans with parchment paper to prevent sticking and ensure even baking.
- Mix dough: In a large mixing bowl, use a stand or hand mixer to beat together the red velvet cake mix, eggs, and whipped cream cheese spread for 1-2 minutes until a soft, sticky dough forms. This ensures all ingredients are well combined and the dough is smooth.
- Prepare powdered sugar coating: Pour the powdered sugar into a shallow bowl. This will be used to coat the cookie dough balls, giving the cookies a sweet, crackled exterior.
- Scoop and coat dough balls: Using a 1 ½ tablespoon cookie scoop, drop balls of dough into the powdered sugar. Roll the dough in the sugar to coat evenly, then shape into smooth, even balls to ensure uniform baking.
- Arrange and bake: Place the coated cookie dough balls about 1-2 inches apart on the prepared baking sheets to allow room for spreading. Bake in the preheated oven for 8-11 minutes or until the edges are set but the centers remain soft.
- Cool and serve: Let the cookies cool on the baking sheet for 3-5 minutes before transferring them to a cooling rack. Serve warm for the best texture and flavor or at room temperature.
Notes
- For thicker cookies, chill the dough for 30 minutes before scooping.
- Adjust baking time slightly if using a convection oven, reducing by 1-2 minutes.
- Whipped cream cheese spread can be substituted with regular softened cream cheese, but it may alter the texture slightly.
- Store cookies in an airtight container at room temperature for up to 3 days.
- Freezing cookie dough balls before baking is possible—freeze on a tray, then transfer to a bag for up to 1 month. Bake from frozen, adding a couple minutes to bake time.


